Bit4id Onboarding API (1.5.2)
Onboarding allows the online identification process to be carried out with the support of specialized operators, implementing all the steps required by the Know-Your-Customer regulations.
Generally, there are two types of certified onboarding identification methods:
Self-Service, with the certified recognition types using the SPID/CIE/CNS and AI services provided with computer vision and speech recognition algorithms
Assisted, available to carry out de visu recognition or certified video conferencing with a trained operator
Every procedure is 100% paperless. The Onboarding service together with Signing allows you to sign contracts with legal value by issuing electronic signature certificates.
Onboarding provides multiple roles, according to the request privileges:
manager, in charge of creating, editing and disabling operators, as well as collecting data and achieving the completion of recognition processes
approver, in charge of collecting data for and approving assisted recognition processes
operator, in charge of collecting data for recognition practices.
In Onboarding platform is possible to accomplish many recognition processes, the most used are:
SPID/CIE/CNS/FEQ certified recognition: the user can be recognized thanks to his certified digital identity without the need to upload any identity document
AI certified identification: processes based on Artificial Intelligence in order to automatically check user identity, collected data and uploaded documents; the algorithms verify the identity through biometric comparison and proof of life ensuring regulatory compliance (AML, KyC and Adequate Verification) of the entire process
DeVisu Identification: an operator who meets the customer to be recognized in person will fill out a pre-set/custom form to register the user without the need for prints or scans, from entering the request to verifying the document
Recognition with certified videoconferencing: the procedure is similar to that listed in the previous point with the difference that the client can be called remotely.
The environments to integrate Onboarding via API are different according to the purpose.
| Environment | Description | Endpoint |
|---|---|---|
| Sandbox | Test environment | https://api.sandbox.onboardingtoday.com |
| Demo | Demo environment | https://api.demo.onboardingtoday.com |
| Live | Production environment | https://api.onboardingtoday.com |
API environments and WEB environments follow the same semantics described in the previous paragraph.
Access to the WEB environment, even in the case of API integration, is recommended to retrieve useful data for the correct configuration of the onboarding request creation payload.
| Environment | Description | Endpoint |
|---|---|---|
| Sandbox | Test environment | https://web.sandbox.onboardingtoday.com |
| Demo | Demo environment | https://web.demo.onboardingtoday.com |
| Live | Production environment | https://web.onboardingtoday.com |
This tutorial shows you how to be getting started with Onboarding API, by creating your first identification request.
To use the Onboarding API, it is important that you understand the basics of RESTful web services and JSON representations.
Before you begin
Choose the right environment to contact among SANDBOX, DEMO, LIVE (e.g. https://api.sandbox.onboardingtoday.com)
Choose your authentication type between X-API-KEY and JWT:
To use the X-API-KEY, you need to define the
x-api-keyHTTP header which contains the x-api-key value. The X-API-KEY token is static and has no expiration. The x-api-key value is sent to the Onboarding user with the email for the first access to the platform.To use the JWT token, you need to obtain it by calling the API /auth (described below). Then, you need to use the
AuthorizationHTTP header which contains the value Bearer then a blank space and the JWT token. JWT token has an expiration of 10 minutes, so it must be refreshed before, otherwise it has to be requested each time you call the Onboarding API.
Remember that, if the request has a body, another HTTP header is required:
Content-Type, withapplication/jsonvalue.(optional) Choose a webhook service to receive notifications from onboarding. The onboarding platform sends POST requests which contains useful data such as:
request identifier:
data.id;current status of the onboarding request:
data.current_status;
Step 1 Create a request
Create a request using the Create new request API, necessarily defining:
the request
typethat is the identifier of the onboarding requestthe
domainto refer the onboarding request to (this data is provided with the activation of the service)the
userobject (name, surname, tax identifier and e-mail address)the
notification_channelfield the link to the chosen notification service.
Disclaimer: An Onboarding request can be also anonymized omitting user parameter just in case this scenario is supported
by the request type.
Step 2 Get the request ticket
The response of the Create new request API will contain the request_ticket.
That is the pre-authenticated link to access the onboarding process.
Otherwise, if you want to obtain the request ticket in other ways, you can call the Get an identification request API passing the request identifier.
Step 3 Complete the onboarding
The request ticket is sent to the user's e-mail address (if specified and supported by the onboarding request type).
Otherwise, the request ticket can be sent externally to the user (e.g., by redirecting the user journey to the onboarding link).
To test the workflow, complete yourself the process and check what happen at the end (on the set notification channel and calling a Get an identification request API on the request identifier).
In the API reference below, the following HTTP verbs are used.
| Method | Description |
|---|---|
GET |
Request data from a resource |
POST |
Send data to create or modify a resource |
PATCH |
Send data to modify a resource |
DELETE |
Delete a resource |
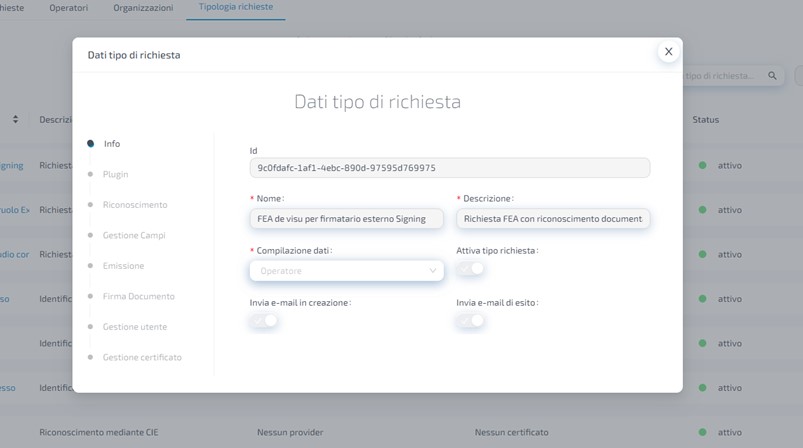
Onboarding offers multiple types of workflows. An Onboarding request type is a unique process available on the platform and more than one request type can be associated with a single domain.
A request type represents the onboarding workflow which can be finalized for recognition only or spent to issue a digital identity certificate. Moreover, the recognition workflow could be spent by the customer (e.g., the authentication or the AI process) or by an operator (e.g., the KyC assisted by an operator).
To create an onboarding request, you need to specify the request type which is represented by a UUIDv4 string.
Disclaimer: Every single type must be activated on demand.
A request can have multiple statuses, which are described in table.
| Code | Description |
|---|---|
draft |
user intervention is required to accept terms and conditions or to carry out some preliminary operations |
created |
user intervention is required to fill in the fields for the indicated request types |
processing |
in the case of automatic video recognition, Onboarding is processing the request |
compiled |
requires the intervention of an approver to approve the request |
approved |
you request the intervention of an approver to issue the certificate for the recognized user |
issued |
in the case of certificate issuance, that operation is successfully completed |
performed |
the request has been successfully completed |
rejected |
the request has been rejected |
cancelled |
the request has been cancelled |
The succession of the states is described in the finite state machine below. Even if a request type does not provide one of the represented statuses (e.g., in a request finalized to the only recognition with no certificate issuance) the request goes through all the statuses without jumping over them (so, you could receive some skippable notifications).
Note: Draft state is passed only if your request type needs to use a plug-in. A plug-in is a component added to the standard flow of the request type that allows you to make additional operation as being compliant with AML standard.
Below is a table illustrating each state associated with an identification and FEA issuance process.
State semantic for identification process
| Code | SPID/CIE/CNS/FEQ Identification | AI Identification | De visu Identification |
|---|---|---|---|
draft |
The request has been created and user intervention is required in order to accept terms and conditions | The request has been created and user intervention is required in order to accept terms and conditions | The request has been created and user intervention is required in order to accept terms and conditions |
created |
The request has been created, user intervention is required | N.A. | The request has been created, operator intervention is required |
processing |
N.A. | The request has been created, user intervention is required | N.A. |
compiled |
N.A. | N.A. | The request has been compiled by an operator |
approved |
N.A. | N.A. | The request was approved, aborted by an approver |
issued |
N.A. | N.A. | N.A. |
performed |
The request was successfully completed | N.A. | The request was successfully completed |
rejected |
N.A. | The request was rejected, aborted by an operator | The request was rejected, aborted by an approver |
cancelled |
The request was cancelled (e.g. due to a mismatch of the fiscal code) | N.A. | The request was cancelled, aborted by an operator |
State semantic for Digital Identity issuance process
| Code | FEA/FEQ with SPID/CIE Identification | FEA/FEQ with AI Identification | FEA/FEQ with De visu Identification |
|---|---|---|---|
draft |
The request has been created and user intervention is required in order to accept terms and conditions | The request has been created and user intervention is required in order to accept terms and conditions | The request has been created and user intervention is required in order to accept terms and conditions |
created |
The request has been created, user intervention is required | N.A. | The request has been created, operator intervention is required |
processing |
N.A. | The request has been created, user intervention is required | N.A. |
compiled |
N.A. | N.A. | The request has been compiled by an operator |
approved |
N.A. | The request was approved, aborted by an approver | The request was approved, aborted by an approver |
issued |
The FEA certificate was successfully issued | The FEA certificate was successfully issued | The FEA certificate was successfully issued |
performed |
The request was successfully completed | N.A. | The request was successfully completed |
rejected |
N.A. | The request was rejected, aborted by an operator | The request was rejected, aborted by an approver |
cancelled |
The request was cancelled (e.g. due to a mismatch of the fiscal code) | N.A. | The request was cancelled, aborted by an operator |
You will receive notifications for each recognition/issuance process only if you have setted a notification channel when creating the request. In each notification you can see details about:
id: identifier of the associated onboarding requestaction: which let you know what kind of operation was made (also automatically from the system)previous_status: which is and empty string for the first notificationcurrent_status: the status represented by the notificationaction_made_by: who has made the operation reported by the notificationrequest_type: the type of the associated request
The webhook notifications received in order since the request was created are described below. You will receive as first notification the following that informs of the happened creation of the practice and the necessity of preliminary actions if provided by the chosen request type:
  {
    "message": "Identity request status changed",
    "notification_created": "<date>",
    "data": {
      "id": "<id>",
      "action": "create",
      "previous_status": "",
      "current_status": "draft",
      "timestamp": "<timestamp>",
      "action_made_by": {
        "fiscal_code": "<cf>",
        "role": "<role>",
        "organization_path": "onboarding"
      },
      "request_type": {
        ...
      },
      "metric_type": "REQUEST_EVENT"
    }
  }
Otherwise as first notification you will receive the following informing you of the creation of the request:
{
  "message": "Identity request status changed",
  "notification_created": "<date>",
  "data": {
    "id": "<id>",
    "action": "create",
    "previous_status": "",
    "current_status": "created",
    "timestamp": "<timestamp>",
    "action_made_by": {
      "fiscal_code": "<cf>",
      "role": "<role>",
      "organization_path": "onboarding"
    },
    "request_type": {
      ...
    },
    "metric_type": "REQUEST_EVENT"
  }
}
If you have recieved the draft status notification you will see as previous_status the draft in the body of the created request notification.
After the data entry performed by the customer or by an operator, the request will be in the compiled status:
{
  "message": "Identity request status changed",
  "notification_created": "<date>",
  "data": {
    "id": "<id>",
    "action": "compile",
    "previous_status": "created",
    "current_status": "compiled",
    "timestamp": "<timestamp>",
    "action_made_by": {
      "fiscal_code": "<cf>",
      "role": "<role>",
      "organization_path": "onboarding"
    },
    "request_type": {
      ...
    },
    "metric_type": "REQUEST_EVENT"
  }
}
After the approval performed by an operator or by the AI algorithm (if provided by the request type):
{
  "message": "Identity request status changed",
  "notification_created": "<date>",
  "data": {
    "id": "<id>",
    "action": "approve",
    "previous_status": "compiled",
    "current_status": "approved",
    "timestamp": "<timestamp>",
    "action_made_by": {
      "fiscal_code": "<cf>",
      "role": "<role>",
      "organization_path": "onboarding"
    },
    "request_type": {
      ...
    },
    "metric_type": "REQUEST_EVENT"
  }
}
Once the request is in approved status, the process of recognition. Otherwise, an operator (or the AI algorithm)
can reject a request. In this case you will receive a notification that shows the current_status valued as rejected.
{
  "message": "Identity request status changed",
  "notification_created": "<date>",
  "data": {
    "id": "<id>",
    "action": "reject",
    "previous_status": "compiled",
    "current_status": "rejected",
    "timestamp": "<timestamp>",
    "action_made_by": {
      "fiscal_code": "<cf>",
      "role": "<role>",
      "organization_path": "onboarding"
    },
    "request_type": {
      ...
    },
    "metric_type": "REQUEST_EVENT"
  }
}
Only if the request has got through the approved status, the user can enter the additional data (where necessary in case of certificate issuance).
{
  "message": "Identity request status changed",
  "notification_created": "<date>",
  "data": {
    "id": "<id>",
    "action": "issue",
    "previous_status": "approved",
    "current_status": "issued",
    "timestamp": "<timestamp>",
    "action_made_by": {
      "fiscal_code": "<cf>",
      "role": "<role>",
      "organization_path": "onboarding"
    },
    "request_type": {
    ...
    },
    "metric_type": "REQUEST_EVENT"
  }
}
Once all procedures are over, the performed notification can be sent:
{
  "message": "Identity request status changed",
  "notification_created": "<date>",
  "data": {
    "id": "<id>",
    "action": "perform",
    "previous_status": "issued",
    "current_status": "performed",
    "timestamp": "<timestamp>",
    "action_made_by": {
      "fiscal_code": "<cf>",
      "role": "<role>",
      "organization_path": "onboarding"
    },
    "request_type": {
      ...
    },
    "metric_type": "REQUEST_EVENT"
  }
}
A request could be cancelled after an error or ticket expiration and you will receive a notification like this.
{
  "message": "Identity request status changed",
  "notification_created": "<date>",
  "data": {
    "id": "<id>",
    "action": "cancel",
    "previous_status": "previous_status",
    "current_status": "cancelled",
    "timestamp": "<timestamp>",
    "action_made_by": {
      "fiscal_code": "<cf>",
      "role": "<role>",
      "organization_path": "onboarding"
    },
    "failure_reason": "<reason>",
    "request_type": {
      ...
    },
    "metric_type": "REQUEST_EVENT"
  }
}
The request_ticket is a pre-authenticated URL to be provided to the user. Through this link, the user can access the
frontend interface to perform the suitable recognition method (authentication, data-entry and so on).
The request ticket is generated at the same time as the creation of the request and can be retrieved in the
request_ticket field in the response of Create an identification request API.
It is also possible to obtain the request_ticket from the Get an identification request API, passing the request identifier.
The request ticket has a configurable duration that shows the expiration time of the ticket.
When the ticket expires, the corresponding request goes into the 'Cancelled' status.
Note: a typical scenario of use of the ticket is the redirection: for example, the customer comes from another platform on which he previously chose to start an onboarding process. In this case, it is possible to exploit a type of request which does not include the functionality of sending emails from Onboarding.
The identification_proof is a pre-authorized link for downloading the proof of identification generated by Onboarding and signed
(e.g., with a qualified electronic seal).
In case of recognition by video, the link allows to download the evidence collected during autonomous or operator-assisted video recognition.
It is possible to get the identification_proof by using the Get an identification request API on a request in status completed
belonging to the proper request type. The link to download the identification proof expires after one hour and you can regenerate
it by repeating the call to the Get an identification request API.
The API section having tag Authentication allows to:
Perform login, simply passing the login credentials in response will return an access token, expendable to navigate the platform;
Perform logout, simply sending a DELETE HTTP to the platform;
Perform refresh-token, simply passing in a POST HTTP the access token;
Perform password change, passing in a POST HTTP the username, the old and new password for the target user;
Perform password change self-service, simply passing in a post request the username of the target user who receive a mail with instruction for changing his password.
Login
by this call you can login with credentials provided
Request Body schema: application/json
object |
Responses
Request samples
- Payload
{- "credentials": {
- "username": "officer_1446",
- "password": "password"
}
}Response samples
- 200
- 401
{- "accessToken": "31989937CA049D88B9DBC91FD0BD264D2D9290527412D089086F752B202B03C9",
- "token": "eyJ0eXAiOiJKV1QiLCJhbGciOiJSUzI1NiJ9.eyJ2ZXJzaW9uIjoiYXV0aGVudGlmeV91c2VyX3YxLjAiLCJwZXJtaXNzaW9ucyI6W3sibmFtZSI6ImF1dGhlbnRpZnkucmVhZCJ9LHsibmFtZSI6ImF1dGhlbnRpZnkud3JpdGUifSx7Im5hbWUiOiJhdXRoZW50aWZ5Lm90cCJ9LHsibmFtZSI6ImF1dGhlbnRpZnkuZ2F0ZXdheSJ9LHsibmFtZSI6Im9uYm9hcmRpbmcuY2FuX3ZpZXdfZG9tYWluIn0seyJuYW1lIjoib25ib2FyZGluZy5jYW5fdmlld19pZGVudGl0eSJ9LHsibmFtZSI6Im9uYm9hcmRpbmcuY2FuX3ZpZXdfaWRlbnRpdHlyZXF1ZXN0In0seyJuYW1lIjoib25ib2FyZGluZy5jYW5fdmlld19pZGVudGl0eXJlcXVlc3R0eXBlIn0seyJuYW1lIjoib25ib2FyZGluZy5jYW5fdmlld19vcGVyYXRvciJ9LHsibmFtZSI6Im9uYm9hcmRpbmcuY2FuX21vZGlmeV9kb21haW4ifSx7Im5hbWUiOiJvbmJvYXJkaW5nLmNhbl9tb2RpZnlfaWRlbnRpdHlyZXF1ZXN0dHlwZSJ9LHsibmFtZSI6Im9uYm9hcmRpbmcuY2FuX2NyZWF0ZV9kb21haW4ifSx7Im5hbWUiOiJvbmJvYXJkaW5nLmNhbl9jcmVhdGVfaWRlbnRpdHlyZXF1ZXN0dHlwZSJ9LHsibmFtZSI6Im9uYm9hcmRpbmcuY2FuX2NyZWF0ZV9vcGVyYXRvciJ9LHsibmFtZSI6Im9uYm9hcmRpbmcuY2FuX21vZGlmeV9vcGVyYXRvciJ9LHsibmFtZSI6Im9uYm9hcmRpbmcuY2FuX2NvbXBpbGVfaWRlbnRpdHlyZXF1ZXN0In0seyJuYW1lIjoiY2FuX2NyZWF0ZV9pZGVddGl0eXByb3BhZ2F0aW9uIn0seyJuYW1lIjoiY2FuX21vZGlmeV9pZGVudGl0eXByb3BhZ2F0aW9uIn0seyJuYW1lIjoiY2FuX3ZpZXdfaWRlbnRpdHlwcm9wYWdhdGlvbiJ9XSwiZmlyc3ROYW1lIjoib25ib2FyZGluZyIsImxhc3ROYW1lIjoib25ib2FyZGluZyIsInJvbGUiOiJhZG1pbmlzdHJhdG9yIiwidGF4SWRlbnRpZmljYXRpb25OdW1iZXIiOiJYWFhYWFhYWFhYWFhYIiwib3JnYW5pemF0aW9uIjp7InBhdGgiOiJvbmJvYXJkaW5nIiwibGV2ZWwiOjEuMCwibGVhZiI6ZmFsc2V9LCJhZGRpdGlvbmFsRGF0YSI6eyJ1c2VybmFtZSI6Im9uYm9hcmRpbmcifSwibWV0YSI6eyJpYXQiOjE2MzUxNzczMzQsImV4cCI6MTYzNTE3NzQ1NCwibmJmIjoxNjM1MTc3MzM0LCJkdXIiOjEyMCwibm9uY2UiOiIzNTM0MGQzZTM4NjhjYzQ0MWMzMCJ9fQ.dp8LaMltDkuhMZYp4omb03pgv9v0XMYGWZkwckWRFi_XTEEaSvagD6Up8M7oWgkKymRPwBEv5ScNqYqmLB9xECJVPwgqoZLMpHE78-jLgVvUR9q-a6HiAFKv7RN2gu4JmG_9ZswRrZf-padzZUoxeySoEpzkPX2uas8tXSWAXqdFCwPB2DzgsqmlYiGaoMcxogWUSOYRa-BxC5V9iIiiS4O-VfnoDKr4yCDG5UBWKFdm9oIWki9chMabfM4-ggnLb7C4TjZ97tNol2rN4Cd5dVfaFfJu3Yrzf2s__aN8yGCTbbTcvMcVoEEla_pWlqnVyZSFR5EdTtOzRLRcEx6HzWna3zJk53vc2bWdmrwvbRhZUMqWVTb76P5Ynu6LboF_iavVWLusKkFqs0JR7oUZH7MDHJSmVknceQXDr2UX3THvJMiCq-UhOs8RqZatvNmhSpS8sx3cwxMZEttBe4WpFClwnGtTIOKDF4llEIR26q7hyrT_hseHlJAZf0JJgK3ho-z3RQgDyjiK7NFpr1ebuIRfKfFNCDXnCVVLW9k53KIuF67rViOYmK1ooiTYvyUm_5rcxO_jI9I2t9-HgMwAncs6ICMl_talPAY8NrssslBD12HgDGuI83Ak0F4gDTJOwRjEdiVwpW0I_6m2qS2GoLvAECioLrh9jPaI2iaIRfY",
- "refresh-token": "eyJ0eXAiOiJKV1QiLCJhbGciOiJSUzI1NiJ9.eyJ2ZXJzaW9uIjoiYXV0aGVudGlmeV9yZWZyZXNoX3YxLjAiLCJ0b2tlbiI6IjM2OTg5OTM3Q0EwNDlEODhCOURCQzkxRkQwQkQyNjREMkQ5MjkwNTI3NDEyRDA4OTA4NkY3NTJCMjAyQjAzQzkiLCJtZXRhIjp7ImlhdCI6MTYzNTE3NzMzNCwiZXhwIjoxNjM1MTc3NTc0LCJuYmYiOjE2MzUxNzczMzQsImR1ciI6MjQwLCJub25jZSI6IjE1YTJjOTg2NmFhMDVmNzE5MTlkIn19.J3TXVSo-b3ygeQtA1BObQpYWIWkKEsSpsJm_Xa_4Idh0uEeWpfAvEXZ5Qq_vhSvCqBlwjjU9-zdpiE8C7dbO8fb_4RSgUMT38oGwa2bTikjDmquFqUucfooARoh1cQ4_OUoV5SLujp1HF9jmTAIJBwArVflMD-gBtNYmNTsDj5wKLU4FB1Hs5bVLO5jHXjgNaNXd-zq4x4HtSn4rDz2ocmtpCOk48Opp2xS4nVay55pZiPywhl-kjxnbFpsK3LhbSN8MixrmMjxol_qKhRdCrf8PIUvEbprW_hN9x83tT8RHXZxhcLxAGz39VSpvh32j9bw3pfXcd5EuNBJljiYf0JnJFe5e_x3qZuIBDtqK7oVrhkaIoA5J4BMSl1rkEPQVZ-x4y8NkdMFi56NAbve5xvR9mx35_OHxkxIRhXkqfgFqH28_qH64812KI4d2i5Ji-bkrN3KzAgYLUgTOThxpbZInSa4jDS-U5NPyaZFyAQejjxAtTLhFkG7EAPvYfdVrq5i5LMtMsuD0bMm2kTQBqxrVUjTrLouNacW9awTibz8dlqZZvj4yIYzAZzbGEd7S3nDkSpw9Z3wPFdVA8724RCEBmUQFqHADM4uINkG6lRKmQ7Nt9X4IBiPQHZVT1gLjnmZkvffCUDNaEMnvUtaJ1mE-GVHPWCXxTOqfdsBfEGw"
}Refresh JWT token
by this call you can refresh the access token
Request Body schema: text/plain
jwt refresh token
Responses
Response samples
- 401
{- "error": {
- "type": "TokenExpiredError",
- "title": "Token error",
- "status": 401,
- "code": 1011,
- "detail": "Token is too old",
- "trace_id"": "EScNtQjalSHfifAj"
}
}The API section having tag Requests allows to:
Create a request, allows you to define parameters like:
user, allows you to define the user to be recognised. The parameters defined in user field are used for some controls in identification process for example thefiscal_codeis used in the SPID identification process to check that the parameters provided by the provider are those of the declared individual. The security control involves matching the declared fiscal code with the one received in the SPID provider's metadata. If you do not know the user's info, you may not fill in the field and create an anonymous request;urlback, allows the entry of a url that will be contacted after a file enters the completed status. The platform will contact the defined link with status 10 (completed) and the request_id as query param;notification_channelsparameter values the list of channels on which the change of status of the request is intended to be communicated. Below is the example:external_reference, can be used to introduce a constraint. If you have created a request with the external reference value, you can't create a new request with the same external reference. It could be useful if you need to bind the onboarding request with an external flow.metadatafield to pass subsidiary information for the request on which no search will be possible. It can be used to pass on the information needed to use LiveID, if included in the purchased package, or for some tracking metrics of interest to your company. Is in general a field, which allows you to customize your flow.
Read one or more request by sending a GET HTTP
Delete request, by sending the id of the target request in a DELETE HTTP
Make an action, for example request compiled.
Create an identification request
When creating a request on Onboarding, is possible to include into body of
the request the notification_channels parameter by valorizing the list of channels on which the change of status of
the request is intended to be communicated.
Authorizations:
Request Body schema: application/json
request data
required | object User's information |
| type required | string <uuid> UUID of the associated request type |
| domain required | string slug domain |
| language | string code of the request language |
| external_reference | string Value for bind the request with an external flows |
| urlback | string url to redirect the user when the process is complete |
Array of objects |
Responses
Request samples
- Payload
{- "user": { },
- "type": "8d3aff05-8670-48e1-9532-62b44af5067b",
- "domain": "bit4id",
- "language": "it",
- "notification_channels": [
- {
- "http_options": {
- "headers": [
- {
- "Content-Type": "application/json"
}
], - "auth": {
- "username": "jdo",
- "password": "Bit-4-Id"
}
}
}
]
}Response samples
- 201
- 400
- 401
- 403
{- "id": "9289db47-0aeb-4ad1-bbe0-98d1fcbcce18",
- "type_name": "FEA Gestita DeVisu - nessuna propagazione",
- "created_by": "DBBPGS78L95G470D",
- "user": {
- "first_name": "Mario",
- "last_name": "Rossi",
- "fiscal_code": "RSSMRA80A01H501U",
- "email": "mario.rossi@example.com"
}, - "self_compile": false,
- "domain": "bit4id",
- "additional_fields": [
- {
- "value": "Mario Rossi",
- "id": "a4ab6a26-a077-4cee-9f2f-253f7f460855",
- "field_id": "name",
- "required": true,
- "name": "Name",
- "type": "input",
- "allowed_value": "^mi chiamo"
}
], - "created_at": "2021-09-10T08:38:10.791434Z",
- "label": "FEA uanataca",
- "status": "draft",
- "data": { },
- "next_action_date": null,
- "last_update_at": "2021-09-10T08:38:10.791434Z",
- "agreement_document": [
- { }
], - "failure_reason": "string",
- "type": "9289db47-0aeb-4ad1-bbe0-98d1fcbcce18"
}List all the identification requests
Authorizations:
query Parameters
| name | string Example: name=John Doe Name of the subject whom the identification has been requested |
| id | string <uuid> Example: id=a4ab54326-a077-4cee-9f2f-253f7460855 Identification request uuid |
| mobile_number | string Example: mobile_number=+393491234567 Mobile number of the subject whom the identification has been requested |
| identity_enroll_from | string Example: identity_enroll_from=01/01/2022 Lower bound of the search of the enroll date |
| identity_enroll_to | string Example: identity_enroll_to=01/01/2022 Upper bound of the search of the enroll date |
| identity_expiration_from | string Example: identity_expiration_from=01/01/2022 Lower bound of the search of the expiration date |
| identity_expiration_to | string Example: identity_expiration_to=01/01/2022 Upper bound of the search of the expiration date |
| identity_request_created_from | string Example: identity_request_created_from=01/01/2022 Lower bound of the search of the creation date |
| identity_request_created_to | string Example: identity_request_created_to=01/01/2022 Upper bound of the search of the creation date |
| created_by | string Example: created_by=Jane Doe Name of the user who created the identification request |
| status | string Example: status=CREATED Status of the identification request |
| request_type | string Example: request_type=SPID Name of the type of identification request |
| request_type_id | string <uuid> Example: request_type_id=a4ab54326-a077-4cee-9f2f-253f7460855 Uuid of the type of identification request |
Responses
Response samples
- 200
- 400
- 401
- 403
{- "count": 1,
- "next": null,
- "previus": null,
- "results": [
- {
- "id": "9289db47-0aeb-4ad1-bbe0-98d1fcbcce18",
- "type_name": "FEA Gestita DeVisu - nessuna propagazione",
- "created_by": "DBBPGS78L95G470D",
- "user": {
- "first_name": "Mario",
- "last_name": "Rossi",
- "fiscal_code": "RSSMRA80A01H501U",
- "email": "mario.rossi@example.com"
}, - "self_compile": false,
- "domain": "bit4id",
- "additional_fields": [
- {
- "value": "Mario Rossi",
- "id": "a4ab6a26-a077-4cee-9f2f-253f7f460855",
- "field_id": "name",
- "required": true,
- "name": "Name",
- "type": "input",
- "allowed_value": "^mi chiamo"
}
], - "created_at": "2021-09-10T08:38:10.791434Z",
- "label": "FEA uanataca",
- "status": "created",
- "data": { },
- "next_action_date": null,
- "last_update_at": "2021-09-10T08:38:10.791434Z",
- "agreement_document": [
- { }
], - "failure_reason": "string",
- "type": "9289db47-0aeb-4ad1-bbe0-98d1fcbcce18"
}
]
}Get an identification request
Get request
Authorizations:
path Parameters
| id required | string <uuid> ID of the request to find out |
Responses
Response samples
- 200
- 404
{- "id": "a3a0ae6e-7454-45ea-8085-d7b3e897d968",
- "type_name": "FEA Gestita",
- "created_by": {
- "id": "a3a0ae6e-7454-45ea-8085-d7b3e897d968",
- "domain": "a3a0ae6e-7454-45ea-8085-d7b3e897d968",
- "firstName": "Mario",
- "lastName": "Rossi"
}, - "enroll_ticket": null,
- "plugin": "journey",
- "user": {
- "id": "a3a0ae6e-7454-45ea-8085-d7b3e897d968",
- "ic_document_image_front": "data:image/jpeg;base64,/9j/4AAQSkZJRgABAQEAZABkAAD",
- "ic_document_image_rear": "data:image/jpeg;base64,/9j/4AAQSkZJRgABAQEAZABkAAD",
- "ts_document_image_front": "data:image/jpeg;base64,/9j/4AAQSkZJRgABAQEAZABkAAD",
- "ts_document_image_rear": "data:image/jpeg;base64,/9j/4AAQSkZJRgABAQEAZABkAAD",
- "created": "2021-04-29T07:51:35.564852Z",
- "first_name": "Mario",
- "last_name": "Rossi",
- "fiscal_code": "RSSMRA80A01H501U",
- "sex": "M",
- "birth_date": "2019-08-24T14:15:22Z",
- "birth_country": "IT",
- "birth_city": "Roma",
- "birth_state": "CE",
- "address": "via test",
- "address_number": 19,
- "country": "IT",
- "city": "Roma",
- "state": "CE",
- "zip_code": 81016,
- "email": "mario.rossi@example.com",
- "mobile_phone": 390000000000,
- "phone": 20000000000,
- "document_country": "IT",
- "document_type": 1,
- "document_number": "AS12345HH",
- "document_issuing_authority": "Comune di Roma",
- "document_release_date": "2021-03-02",
- "document_expire_date": "2031-03-02"
}, - "additional_fields": [
- {
- "value": "Mario Rossi",
- "id": "a4ab6a26-a077-4cee-9f2f-253f7f460855",
- "field_id": "name",
- "required": true,
- "name": "Name",
- "type": "input",
- "allowed_value": "^mi chiamo"
}
], - "enrolled_certificates": [
- "string"
], - "recognition_mode": {
- "spid": true,
- "cie": true,
- "cns": true,
- "manual": false,
- "identity_provider": "LOGIN"
}, - "recognition_name": "IDP",
- "recognition_subtype": "SPID",
- "spid_level": 3,
- "user_propagation_type": null,
- "self_compile": true,
- "anonymous": true,
- "identification_type": 0,
- "slug": "onboarding",
- "created_at": "2021-04-29T07:51:35.618365Z",
- "label": "test",
- "status": "performed",
- "data": {
- "iva_code": "<iva_code>",
- "spid_code": "NAMI0001522330",
- "company_name": "Bit4id",
- "registered_office": "",
- "uanataca_oneshot_pk": ""
}, - "provider_detail": { },
- "next_action_date": "2021-04-29T07:51:35.618365Z",
- "last_update_at": "2021-04-29",
- "agreement_document": [
- null
], - "type": "b87a4772-7a24-405c-a06e-2769a10a7d3d",
- "identity_data_settings": [
- {
- "field": "first_name",
- "enabled": true,
- "visible": true,
- "editable": true,
- "required": true
}
], - "meta_data": { }
}The API section having tag Requests types allows to:
List all types for a specific provider, e.g. Types enabled for SPID provider
List all types enabled for your organisation
Modify filed of a specific request type
Create new request type
Retrieve information about a specific request type
Delete a specific request type
Retrieve Identity Request type
Authorizations:
path Parameters
| id required | string Example: af253294-d503-45f4-b3b3-05188b3ad887 |
header Parameters
| Content-Type | string Example: application/json |
Responses
Response samples
- 201
- 400
- 401
- 403
- 404
{- "name": "Richiesta FEA Gestita",
- "provider": "4c88bd2c-1b68-4a0a-8c93-6d6d6e1a068e",
- "certificate_type": "4c88bd2c-1b68-4a0a-8c93-6d6d6e1a068e",
- "recognition_id": "4c88bd2c-1b68-4a0a-8c93-6d6d6e1a068e",
- "id": "a4ab6a26-a077-4cee-9f2f-253f7f460855",
- "provider_name": "Uanataca",
- "certificate_type_name": "FEA",
- "description": "Richiesta FEA Gestita con firmatario esterno - Uanataca",
- "self_compile": true,
- "is_active": true,
- "propagation_info": {
- "id": "4c88bd2c-1b68-4a0a-8c93-6d6d6e1a068e",
- "propagation_type": "<integer>",
- "url": "web.sandbox.com",
- "studio_token": "<uuid>",
- "st_token": "<uuid>",
- "default": false,
- "user_type": 0
}, - "additional_fields": [
- {
- "field_id": "name",
- "required": true,
- "name": "Name",
- "type": "input",
- "id": "a4ab6a26-a077-4cee-9f2f-253f7f460855",
- "allowed_value": "^mi chiamo"
}, - {
- "field_id": "name",
- "required": true,
- "name": "Name",
- "type": "input",
- "id": "a4ab6a26-a077-4cee-9f2f-253f7f460855",
- "allowed_value": "^mi chiamo"
}
]
}List all Request Types
by this call you can list all request type
Authorizations:
query Parameters
| name | string Example: name=firma Name of the request type |
| limit | integer Example: limit=30 |
| page | integer Example: page=1 |
Responses
Response samples
- 200
- 400
- 401
- 403
- 404
{- "count": 1,
- "next": "velit Duis sint pariatur laboris",
- "previus": "do veniam incididunt aliquip",
- "results": [
- {
- "id": "a4ab6a26-a077-4cee-9f2f-253f7f460855",
- "type_name": "FEA Gestita",
- "created_by": {
- "id": "a3a0ae6e-7454-45ea-8085-d7b3e897d968",
- "domain": "a3a0ae6e-7454-45ea-8085-d7b3e897d968",
- "firstName": "Piergiuseppe",
- "lastName": "D'Abbraccio"
}, - "user": {
- "id": "a3a0ae6e-7454-45ea-8085-d7b3e897d968",
- "ic_document_image_front": "<base64>",
- "ic_document_image_rear": "<base64>",
- "ts_document_image_front": "<base64>",
- "ts_document_image_rear": "<base64>",
- "created": "<dateTime>",
- "first_name": "Piergiuseppe",
- "last_name": "D'Abbraccio",
- "fiscal_code": "DBBPGS96L29G596R",
- "sex": "M",
- "birth_date": "<dateTime>",
- "birth_country": "IT",
- "birth_city": "Piedimonte Matese",
- "birth_state": "CE",
- "address": "via test",
- "address_number": "<string>",
- "country": "IT",
- "city": "San Potito Sannitico",
- "state": "CE",
- "zip_code": "<string>",
- "email": "pda@bit4id.com",
- "mobile_phone": "<string>",
- "phone": "<string>",
- "document_country": "IT",
- "document_type": "<string>",
- "document_number": "DA95583BH",
- "document_issuing_authority": "Comune di San Potito Sannitico",
- "document_release_date": "<string>",
- "document_expire_date": "<string>"
}, - "additional_fields": [
- {
- "field_id": "name",
- "required": true,
- "name": "Name",
- "type": "input",
- "id": "a4ab6a26-a077-4cee-9f2f-253f7f460855",
- "allowed_value": "^mi chiamo"
}, - {
- "field_id": "name",
- "required": true,
- "name": "Name",
- "type": "input",
- "id": "a4ab6a26-a077-4cee-9f2f-253f7f460855",
- "allowed_value": "^mi chiamo"
}
], - "self_compile": true,
- "slug": "onboarding",
- "created_at": "quis in",
- "label": "test",
- "status": "performed",
- "data": { },
- "provider_detail": { },
- "next_action_date": "1973-05-09T21:56:16.785Z",
- "last_update_at": "2000-09-23T16:54:05.629Z",
- "type": "b87a4772-7a24-405c-a06e-2769a10a7d3d"
}, - {
- "id": "a4ab6a26-a077-4cee-9f2f-253f7f460855",
- "type_name": "FEA Gestita",
- "created_by": {
- "id": "a3a0ae6e-7454-45ea-8085-d7b3e897d968",
- "domain": "a3a0ae6e-7454-45ea-8085-d7b3e897d968",
- "firstName": "Piergiuseppe",
- "lastName": "D'Abbraccio"
}, - "user": {
- "id": "a3a0ae6e-7454-45ea-8085-d7b3e897d968",
- "ic_document_image_front": "<base64>",
- "ic_document_image_rear": "<base64>",
- "ts_document_image_front": "<base64>",
- "ts_document_image_rear": "<base64>",
- "created": "<dateTime>",
- "first_name": "Piergiuseppe",
- "last_name": "D'Abbraccio",
- "fiscal_code": "DBBPGS96L29G596R",
- "sex": "M",
- "birth_date": "<dateTime>",
- "birth_country": "IT",
- "birth_city": "Piedimonte Matese",
- "birth_state": "CE",
- "address": "via test",
- "address_number": "<string>",
- "country": "IT",
- "city": "San Potito Sannitico",
- "state": "CE",
- "zip_code": "<string>",
- "email": "pda@bit4id.com",
- "mobile_phone": "<string>",
- "phone": "<string>",
- "document_country": "IT",
- "document_type": "<string>",
- "document_number": "DA95583BH",
- "document_issuing_authority": "Comune di San Potito Sannitico",
- "document_release_date": "<string>",
- "document_expire_date": "<string>"
}, - "additional_fields": [
- {
- "field_id": "name",
- "required": true,
- "name": "Name",
- "type": "input",
- "id": "a4ab6a26-a077-4cee-9f2f-253f7f460855",
- "allowed_value": "^mi chiamo"
}, - {
- "field_id": "name",
- "required": true,
- "name": "Name",
- "type": "input",
- "id": "a4ab6a26-a077-4cee-9f2f-253f7f460855",
- "allowed_value": "^mi chiamo"
}
], - "self_compile": true,
- "slug": "onboarding",
- "created_at": "consequat ullamco",
- "label": "test",
- "status": "performed",
- "data": { },
- "provider_detail": { },
- "next_action_date": "1946-10-18T08:28:44.340Z",
- "last_update_at": "1988-02-05T19:40:55.431Z",
- "type": "b87a4772-7a24-405c-a06e-2769a10a7d3d"
}
]
}List all Providers
by this call you can list all request type
Authorizations:
query Parameters
| recognition_name | string Example: recognition_name=selfid |
Responses
Response samples
- 200
- 400
- 401
- 403
- 404
{- "count": 1,
- "next": "velit Duis sint pariatur laboris",
- "previus": "do veniam incididunt aliquip",
- "results": [
- {
- "id": "a4ab6a26-a077-4cee-9f2f-253f7f460855",
- "type_name": "FEA Gestita",
- "created_by": {
- "id": "a3a0ae6e-7454-45ea-8085-d7b3e897d968",
- "domain": "a3a0ae6e-7454-45ea-8085-d7b3e897d968",
- "firstName": "Piergiuseppe",
- "lastName": "D'Abbraccio"
}, - "user": {
- "id": "a3a0ae6e-7454-45ea-8085-d7b3e897d968",
- "ic_document_image_front": "<base64>",
- "ic_document_image_rear": "<base64>",
- "ts_document_image_front": "<base64>",
- "ts_document_image_rear": "<base64>",
- "created": "<dateTime>",
- "first_name": "Piergiuseppe",
- "last_name": "D'Abbraccio",
- "fiscal_code": "DBBPGS96L29G596R",
- "sex": "M",
- "birth_date": "<dateTime>",
- "birth_country": "IT",
- "birth_city": "Piedimonte Matese",
- "birth_state": "CE",
- "address": "via test",
- "address_number": "<string>",
- "country": "IT",
- "city": "San Potito Sannitico",
- "state": "CE",
- "zip_code": "<string>",
- "email": "pda@bit4id.com",
- "mobile_phone": "<string>",
- "phone": "<string>",
- "document_country": "IT",
- "document_type": "<string>",
- "document_number": "DA95583BH",
- "document_issuing_authority": "Comune di San Potito Sannitico",
- "document_release_date": "<string>",
- "document_expire_date": "<string>"
}, - "additional_fields": [
- {
- "field_id": "name",
- "required": true,
- "name": "Name",
- "type": "input",
- "id": "a4ab6a26-a077-4cee-9f2f-253f7f460855",
- "allowed_value": "^mi chiamo"
}, - {
- "field_id": "name",
- "required": true,
- "name": "Name",
- "type": "input",
- "id": "a4ab6a26-a077-4cee-9f2f-253f7f460855",
- "allowed_value": "^mi chiamo"
}
], - "self_compile": true,
- "slug": "onboarding",
- "created_at": "quis in",
- "label": "test",
- "status": "performed",
- "data": { },
- "provider_detail": { },
- "next_action_date": "1973-05-09T21:56:16.785Z",
- "last_update_at": "2000-09-23T16:54:05.629Z",
- "type": "b87a4772-7a24-405c-a06e-2769a10a7d3d"
}, - {
- "id": "a4ab6a26-a077-4cee-9f2f-253f7f460855",
- "type_name": "FEA Gestita",
- "created_by": {
- "id": "a3a0ae6e-7454-45ea-8085-d7b3e897d968",
- "domain": "a3a0ae6e-7454-45ea-8085-d7b3e897d968",
- "firstName": "Piergiuseppe",
- "lastName": "D'Abbraccio"
}, - "user": {
- "id": "a3a0ae6e-7454-45ea-8085-d7b3e897d968",
- "ic_document_image_front": "<base64>",
- "ic_document_image_rear": "<base64>",
- "ts_document_image_front": "<base64>",
- "ts_document_image_rear": "<base64>",
- "created": "<dateTime>",
- "first_name": "Piergiuseppe",
- "last_name": "D'Abbraccio",
- "fiscal_code": "DBBPGS96L29G596R",
- "sex": "M",
- "birth_date": "<dateTime>",
- "birth_country": "IT",
- "birth_city": "Piedimonte Matese",
- "birth_state": "CE",
- "address": "via test",
- "address_number": "<string>",
- "country": "IT",
- "city": "San Potito Sannitico",
- "state": "CE",
- "zip_code": "<string>",
- "email": "pda@bit4id.com",
- "mobile_phone": "<string>",
- "phone": "<string>",
- "document_country": "IT",
- "document_type": "<string>",
- "document_number": "DA95583BH",
- "document_issuing_authority": "Comune di San Potito Sannitico",
- "document_release_date": "<string>",
- "document_expire_date": "<string>"
}, - "additional_fields": [
- {
- "field_id": "name",
- "required": true,
- "name": "Name",
- "type": "input",
- "id": "a4ab6a26-a077-4cee-9f2f-253f7f460855",
- "allowed_value": "^mi chiamo"
}, - {
- "field_id": "name",
- "required": true,
- "name": "Name",
- "type": "input",
- "id": "a4ab6a26-a077-4cee-9f2f-253f7f460855",
- "allowed_value": "^mi chiamo"
}
], - "self_compile": true,
- "slug": "onboarding",
- "created_at": "consequat ullamco",
- "label": "test",
- "status": "performed",
- "data": { },
- "provider_detail": { },
- "next_action_date": "1946-10-18T08:28:44.340Z",
- "last_update_at": "1988-02-05T19:40:55.431Z",
- "type": "b87a4772-7a24-405c-a06e-2769a10a7d3d"
}
]
}Make action on a request
by this call you can compile and approve an identity request
Authorizations:
path Parameters
| id required | string <uuid> ID of the request to find out |
Request Body schema: application/json
request action payload
| action required | string choice -> compile - approve |
object |
Responses
Request samples
- Payload
{- "action": "compile",
- "data": {
- "id": "a3a0ae6e-7454-45ea-8085-d7b3e897d968",
- "ic_document_image_front": "data:image/jpeg;base64,/9j/4AAQSkZJRgABAQEAZABkAAD",
- "ic_document_image_rear": "data:image/jpeg;base64,/9j/4AAQSkZJRgABAQEAZABkAAD",
- "ts_document_image_front": "data:image/jpeg;base64,/9j/4AAQSkZJRgABAQEAZABkAAD",
- "ts_document_image_rear": "data:image/jpeg;base64,/9j/4AAQSkZJRgABAQEAZABkAAD",
- "created": "2021-04-29",
- "first_name": "Mario",
- "last_name": "Rossi",
- "fiscal_code": "RSSMRA80A01H501U",
- "sex": "M",
- "birth_date": "1980-01-01",
- "birth_country": "IT",
- "birth_city": "Roma",
- "birth_state": "CE",
- "address": "via test",
- "address_number": 19,
- "country": "IT",
- "city": "Roma",
- "state": "CE",
- "zip_code": 81016,
- "email": "mario.rossi@example.com",
- "mobile_phone": 390000000000,
- "phone": 20000000000,
- "document_country": "IT",
- "document_type": 1,
- "document_number": "AS12345HH",
- "document_issuing_authority": "Comune di Roma",
- "document_release_date": "2021-03-02",
- "document_expire_date": "2031-03-02"
}
}Response samples
- 201
- 400
- 401
- 403
{- "user": {
- "first_name": "Mario",
- "last_name": "Rossi",
- "fiscal_code": "RSSMRA80A01H501U",
- "email": "mario.rossi@example.com"
}, - "type": "9289db47-0aeb-4ad1-bbe0-98d1fcbcce18",
- "domain": "bit4id",
- "language": "it",
- "notification_channels": [
- {
- "http_options": {
- "headers": [
- {
- "Content-Type": "application/json"
}
], - "auth": {
- "username": "jdo",
- "password": "Bit-4-Id"
}
}
}
]
}The API section having tag Users allows to:
Create an operator;
Send an email for setting password for first time;
Get the operator list;
Get info about one operator, is possible to know the if the operator is active or not, by exploring the boolean field enabled. Also exploring the field "role" is possible to know the role in a specific organization of this user;
Modify data or setting of an operator, is possible to disable an user calling the API /operator/{cf}/{role}/{org-path} using a PATCH, defining in url the cf of the target user, the role and organization, and defining in body the field "enabled" valued as "false"
Create a new user
By this API is possible to create a new operator
Authorizations:
Request Body schema: application/json
Operator data
| first_name required | string |
| last_name required | string |
| username required | string |
| taxIdentificationNumber required | string [ 16 .. 16 ] |
| email required | string |
| enabled | boolean |
| role required | string choice -> user - officer - rao - manager - administrator |
required | object (Organization) |
Array of objects (Rao) | |
| enabled_requests_type | Array of strings <uuid> |
Responses
Request samples
- Payload
{- "first_name": "Mario",
- "last_name": "Rossi",
- "username": "mro",
- "taxIdentificationNumber": "RSSMRA80A01H501U",
- "email": "mro@mail.com",
- "enabled": true,
- "role": "administrator",
- "organization": {
- "path": "onboarding",
- "level": 1,
- "leaf": true
}, - "rao": [
- {
- "rao_value": 123,
- "rao_id": "4c88bd2c-1b68-4a0a-8c93-6d6d6e1a068e",
- "ra_value": 456,
- "ra_id": "5c79gd4c-1b68-4a0a-8c93-6d6d6e1a051w",
- "provider_id": "5g79kd4c-1b68-4a0a-8c93-6d6d6e1a008f"
}
], - "enabled_requests_type": [
- "a4ab6a26-a077-4cee-9f2f-253f7f460855"
]
}Response samples
- 201
- 400
- 401
- 403
- 409
{- "first_name": "Mario",
- "last_name": "Rossi",
- "username": "mro",
- "taxIdentificationNumber": "RSSMRA80A01H501U",
- "email": "mro@mail.com",
- "enabled": true,
- "role": "administrator",
- "organization": {
- "path": "onboarding",
- "level": 1,
- "leaf": true
}, - "rao": [
- {
- "rao_value": 123,
- "rao_id": "4c88bd2c-1b68-4a0a-8c93-6d6d6e1a068e",
- "ra_value": 456,
- "ra_id": "5c79gd4c-1b68-4a0a-8c93-6d6d6e1a051w",
- "provider_id": "5g79kd4c-1b68-4a0a-8c93-6d6d6e1a008f"
}
], - "enabled_requests_type": [
- "a4ab6a26-a077-4cee-9f2f-253f7f460855"
]
}List all users
By this API is possible to get the list of operator created filtered by one or more optional parameter.
Authorizations:
query Parameters
string Example: email=test@bit4id.com operator email | |
| text | string Example: text=John Doe operator full name |
| role | string Example: role=manager operator role |
| slug | string Example: slug=Onboarding operator organization |
| status | string Example: status=true operator status |
| search | string Example: search=test@bit4id.com operator full name and email |
Responses
Response samples
- 200
[- {
- "count": 1,
- "next": null,
- "previus": null,
- "results": [
- {
- "first_name": "Mario",
- "last_name": "Rossi",
- "username": "mro",
- "taxIdentificationNumber": "RSSMRA80A01H501U",
- "email": "mro@mail.com",
- "enabled": true,
- "role": "administrator",
- "organization": {
- "path": "onboarding",
- "level": 1,
- "leaf": true
}, - "rao": [
- {
- "rao_value": 123,
- "rao_id": "4c88bd2c-1b68-4a0a-8c93-6d6d6e1a068e",
- "ra_value": 456,
- "ra_id": "5c79gd4c-1b68-4a0a-8c93-6d6d6e1a051w",
- "provider_id": "5g79kd4c-1b68-4a0a-8c93-6d6d6e1a008f"
}
], - "enabled_requests_type": [
- "a4ab6a26-a077-4cee-9f2f-253f7f460855"
]
}
]
}
]Get a user
Get operator
Authorizations:
path Parameters
| cf required | string Fiscal code of the operator |
| role required | string Role of the operator |
| org-path required | string Organization path of the operator |
Responses
Response samples
- 200
- 404
{- "first_name": "Mario",
- "last_name": "Rossi",
- "username": "mro",
- "taxIdentificationNumber": "RSSMRA80A01H501U",
- "email": "mro@mail.com",
- "enabled": true,
- "role": "administrator",
- "organization": {
- "path": "onboarding",
- "level": 1,
- "leaf": true
}, - "rao": [
- {
- "rao_value": 123,
- "rao_id": "4c88bd2c-1b68-4a0a-8c93-6d6d6e1a068e",
- "ra_value": 456,
- "ra_id": "5c79gd4c-1b68-4a0a-8c93-6d6d6e1a051w",
- "provider_id": "5g79kd4c-1b68-4a0a-8c93-6d6d6e1a008f"
}
], - "enabled_requests_type": [
- "a4ab6a26-a077-4cee-9f2f-253f7f460855"
]
}Update a user
By this API is possible to modify settings and permission of an operator defined by is cf, role and organization. It's even possible to disable an operator by setting "false" in field enabled.
Authorizations:
path Parameters
| cf required | string Fiscal code of the operator |
| role required | string Role of the operator |
| org-path required | string Organization path of the operator |
Request Body schema: application/json
Operator data
| first_name | string |
| last_name | string |
| username | string |
| taxIdentificationNumber | string [ 16 .. 16 ] |
string | |
| enabled | boolean |
| role | string choice -> user - officer - rao - manager - administrator |
object (Organization) | |
Array of objects (Rao) | |
| enabled_requests_type | Array of strings <uuid> |
Responses
Request samples
- Payload
{- "first_name": "Mario",
- "last_name": "Rossi",
- "username": "mro",
- "taxIdentificationNumber": "RSSMRA80A01H501U",
- "email": "mro@mail.com",
- "enabled": true,
- "role": "administrator",
- "organization": {
- "path": "onboarding",
- "level": 1,
- "leaf": true
}, - "rao": [
- {
- "rao_value": 123,
- "rao_id": "4c88bd2c-1b68-4a0a-8c93-6d6d6e1a068e",
- "ra_value": 456,
- "ra_id": "5c79gd4c-1b68-4a0a-8c93-6d6d6e1a051w",
- "provider_id": "5g79kd4c-1b68-4a0a-8c93-6d6d6e1a008f"
}
], - "enabled_requests_type": [
- "a4ab6a26-a077-4cee-9f2f-253f7f460855"
]
}Response samples
- 200
- 401
- 403
[- {
- "first_name": "Mario",
- "last_name": "Rossi",
- "username": "mro",
- "taxIdentificationNumber": "RSSMRA80A01H501U",
- "email": "mro@mail.com",
- "enabled": true,
- "role": "administrator",
- "organization": {
- "path": "onboarding",
- "level": 1,
- "leaf": true
}, - "rao": [
- {
- "rao_value": 123,
- "rao_id": "4c88bd2c-1b68-4a0a-8c93-6d6d6e1a068e",
- "ra_value": 456,
- "ra_id": "5c79gd4c-1b68-4a0a-8c93-6d6d6e1a051w",
- "provider_id": "5g79kd4c-1b68-4a0a-8c93-6d6d6e1a008f"
}
], - "enabled_requests_type": [
- "a4ab6a26-a077-4cee-9f2f-253f7f460855"
]
}
]The API section having tag Manage password allows to:
Resend email for first password changing;
Change password for a specific user;
Send email for password changing.
Change user password
Authorizations:
Request Body schema: application/json
change user password payload
| username required | string the username of the operator that need to change password |
| old_password required | string |
| new_password required | string |
| new_password_check required | string |
Responses
Request samples
- Payload
{- "username": "mario.rossi",
- "old_password": 123456789,
- "new_password": 987654321,
- "new_password_check": 987654321
}Response samples
- 409
{- "code": 2028,
- "message": "new_password and new_password_check do not match",
- "kwargs": { }
}Send email to reset password
by this call you can send an email to the user the need the password change
Authorizations:
path Parameters
| username required | string <uuid> username of the user that need the password reset |
Responses
Response samples
- 404
{- "code": 2031,
- "message": "Username not found",
- "kwargs": { }
}Resend email for first changing password
by this call you can send an email to the user the need the activation
Authorizations:
path Parameters
| cf required | string Fiscal code of the operator |
| role required | string Role of the operator |
| org-path required | string Organization path of the operator |
Responses
Response samples
- 401
- 403
- 404
{- "code": 11009,
- "message": "Invalid credentials",
- "kwargs": { }
}The API section having tag Domains allows to:
Create New organisation;
Retrieve information about a specific domain using the id or the slug;
Get all sub domains under a master domain;
Modify domains setting, e.g. enable new types;
Delete an organisation.
Patch domain
Authorizations:
path Parameters
| id required | string Example: f8877c68-f9e4-4840-82b2-b34bac3cea3c |
Request Body schema: application/json
| enabled_request_types | Array of arrays |
Responses
Request samples
- Payload
{- "enabled_request_types": [
- "8d3aff05-8670-48e1-9532-62b44af5067b",
- "b8cd0e4c-1703-4153-a5dc-5835fe76e88d"
]
}Response samples
- 200
- 400
- 401
- 403
{- "count": 1,
- "next": "ut ",
- "previus": "sunt commodo mollit",
- "results": [
- {
- "name": "Onboarding",
- "slug": "onboarding",
- "id": "a4ab6a26-a077-4cee-9f2f-253f7f460855",
- "path": "bit4id.onboarding",
- "settings": { },
- "created": "ad ea officia",
- "enabled": true,
- "sub_domains": { },
- "parent_domain": "3f65315a-5524-4104-80f9-3d6252a03ee2",
- "rao": [
- {
- "rao_value": "do fugiat",
- "provider_id": "5186fd45-127f-e953-1b29-1992888fcb94",
- "rao_id": "4c88bd2c-1b68-4a0a-8c93-6d6d6e1a068e",
- "ra_value": "in est",
- "ra_id": "c741acf9-6989-fede-7f8a-3ff72d62d33d"
}, - {
- "rao_value": "conse",
- "provider_id": "urn:uuid:a3ad37d2-09b1-f280-706f-e5d333c4d35c",
- "rao_id": "4c88bd2c-1b68-4a0a-8c93-6d6d6e1a068e",
- "ra_value": "proident laboris",
- "ra_id": "urn:uuid:2f66f63c-1133-7992-37b8-f9a6c0f43154"
}
], - "enabled_request_types": [
- "2e4e0058-808c-4002-881f-c31f3fe5b4de",
- "2e4e0058-808c-4002-881f-c31f3fe5b4de"
]
}, - {
- "name": "Onboarding",
- "slug": "onboarding",
- "id": "a4ab6a26-a077-4cee-9f2f-253f7f460855",
- "path": "bit4id.onboarding",
- "settings": { },
- "created": "",
- "enabled": true,
- "sub_domains": { },
- "parent_domain": "3f65315a-5524-4104-80f9-3d6252a03ee2",
- "rao": [
- {
- "rao_value": "enim commodo",
- "provider_id": "38ab58c0-792e-8514-599b-9b5004590a6a",
- "rao_id": "4c88bd2c-1b68-4a0a-8c93-6d6d6e1a068e",
- "ra_value": "fugiat officia Lorem sed ipsum",
- "ra_id": "urn:uuid:9f1ffd27-1fe8-f69e-6b93-c12d2c1ad2df"
}, - {
- "rao_value": "Duis dolor deserunt",
- "provider_id": "9ebbdfd7-ecc9-ecee-47df-b885fe88155f",
- "rao_id": "4c88bd2c-1b68-4a0a-8c93-6d6d6e1a068e",
- "ra_value": "reprehenderit non id",
- "ra_id": "urn:uuid:06022c36-f992-0bbb-5750-734f02fd083b"
}
], - "enabled_request_types": [
- "2e4e0058-808c-4002-881f-c31f3fe5b4de",
- "2e4e0058-808c-4002-881f-c31f3fe5b4de"
]
}
]
}
Retrieve domain
Authorizations:
path Parameters
| id required | string Example: f8877c68-f9e4-4840-82b2-b34bac3cea3c |
Responses
Response samples
- 200
- 400
- 401
- 403
- 404
{- "count": 1,
- "next": "ut ",
- "previus": "sunt commodo mollit",
- "results": [
- {
- "name": "Onboarding",
- "slug": "onboarding",
- "id": "a4ab6a26-a077-4cee-9f2f-253f7f460855",
- "path": "bit4id.onboarding",
- "settings": { },
- "created": "ad ea officia",
- "enabled": true,
- "sub_domains": { },
- "parent_domain": "3f65315a-5524-4104-80f9-3d6252a03ee2",
- "rao": [
- {
- "rao_value": "do fugiat",
- "provider_id": "5186fd45-127f-e953-1b29-1992888fcb94",
- "rao_id": "4c88bd2c-1b68-4a0a-8c93-6d6d6e1a068e",
- "ra_value": "in est",
- "ra_id": "c741acf9-6989-fede-7f8a-3ff72d62d33d"
}, - {
- "rao_value": "conse",
- "provider_id": "urn:uuid:a3ad37d2-09b1-f280-706f-e5d333c4d35c",
- "rao_id": "4c88bd2c-1b68-4a0a-8c93-6d6d6e1a068e",
- "ra_value": "proident laboris",
- "ra_id": "urn:uuid:2f66f63c-1133-7992-37b8-f9a6c0f43154"
}
], - "enabled_request_types": [
- "2e4e0058-808c-4002-881f-c31f3fe5b4de",
- "2e4e0058-808c-4002-881f-c31f3fe5b4de"
]
}, - {
- "name": "Onboarding",
- "slug": "onboarding",
- "id": "a4ab6a26-a077-4cee-9f2f-253f7f460855",
- "path": "bit4id.onboarding",
- "settings": { },
- "created": "",
- "enabled": true,
- "sub_domains": { },
- "parent_domain": "3f65315a-5524-4104-80f9-3d6252a03ee2",
- "rao": [
- {
- "rao_value": "enim commodo",
- "provider_id": "38ab58c0-792e-8514-599b-9b5004590a6a",
- "rao_id": "4c88bd2c-1b68-4a0a-8c93-6d6d6e1a068e",
- "ra_value": "fugiat officia Lorem sed ipsum",
- "ra_id": "urn:uuid:9f1ffd27-1fe8-f69e-6b93-c12d2c1ad2df"
}, - {
- "rao_value": "Duis dolor deserunt",
- "provider_id": "9ebbdfd7-ecc9-ecee-47df-b885fe88155f",
- "rao_id": "4c88bd2c-1b68-4a0a-8c93-6d6d6e1a068e",
- "ra_value": "reprehenderit non id",
- "ra_id": "urn:uuid:06022c36-f992-0bbb-5750-734f02fd083b"
}
], - "enabled_request_types": [
- "2e4e0058-808c-4002-881f-c31f3fe5b4de",
- "2e4e0058-808c-4002-881f-c31f3fe5b4de"
]
}
]
}Response samples
- 200
- 400
- 401
- 403
- 404
{- "count": 1,
- "next": "ut ",
- "previus": "sunt commodo mollit",
- "results": [
- {
- "name": "Onboarding",
- "slug": "onboarding",
- "id": "a4ab6a26-a077-4cee-9f2f-253f7f460855",
- "path": "bit4id.onboarding",
- "settings": { },
- "created": "ad ea officia",
- "enabled": true,
- "sub_domains": { },
- "parent_domain": "3f65315a-5524-4104-80f9-3d6252a03ee2",
- "rao": [
- {
- "rao_value": "do fugiat",
- "provider_id": "5186fd45-127f-e953-1b29-1992888fcb94",
- "rao_id": "4c88bd2c-1b68-4a0a-8c93-6d6d6e1a068e",
- "ra_value": "in est",
- "ra_id": "c741acf9-6989-fede-7f8a-3ff72d62d33d"
}, - {
- "rao_value": "conse",
- "provider_id": "urn:uuid:a3ad37d2-09b1-f280-706f-e5d333c4d35c",
- "rao_id": "4c88bd2c-1b68-4a0a-8c93-6d6d6e1a068e",
- "ra_value": "proident laboris",
- "ra_id": "urn:uuid:2f66f63c-1133-7992-37b8-f9a6c0f43154"
}
], - "enabled_request_types": [
- "2e4e0058-808c-4002-881f-c31f3fe5b4de",
- "2e4e0058-808c-4002-881f-c31f3fe5b4de"
]
}, - {
- "name": "Onboarding",
- "slug": "onboarding",
- "id": "a4ab6a26-a077-4cee-9f2f-253f7f460855",
- "path": "bit4id.onboarding",
- "settings": { },
- "created": "",
- "enabled": true,
- "sub_domains": { },
- "parent_domain": "3f65315a-5524-4104-80f9-3d6252a03ee2",
- "rao": [
- {
- "rao_value": "enim commodo",
- "provider_id": "38ab58c0-792e-8514-599b-9b5004590a6a",
- "rao_id": "4c88bd2c-1b68-4a0a-8c93-6d6d6e1a068e",
- "ra_value": "fugiat officia Lorem sed ipsum",
- "ra_id": "urn:uuid:9f1ffd27-1fe8-f69e-6b93-c12d2c1ad2df"
}, - {
- "rao_value": "Duis dolor deserunt",
- "provider_id": "9ebbdfd7-ecc9-ecee-47df-b885fe88155f",
- "rao_id": "4c88bd2c-1b68-4a0a-8c93-6d6d6e1a068e",
- "ra_value": "reprehenderit non id",
- "ra_id": "urn:uuid:06022c36-f992-0bbb-5750-734f02fd083b"
}
], - "enabled_request_types": [
- "2e4e0058-808c-4002-881f-c31f3fe5b4de",
- "2e4e0058-808c-4002-881f-c31f3fe5b4de"
]
}
]
}Filter
Authorizations:
query Parameters
| table | string Example: table=Operator |
| columns | string Example: columns=role,domain,status |
Responses
Response samples
- 200
{- "role": [
- {
- "value": "officer",
- "text": "Operatore"
}, - {
- "value": "rao",
- "text": "RAO"
}, - {
- "value": "manager",
- "text": "Manager"
}, - {
- "value": "administrator",
- "text": "Administrator"
}
], - "domain": [
- {
- "value": "bit4id",
- "text": "Bit4id"
}, - {
- "value": "onboarding",
- "text": "Onboarding"
}
], - "status": [
- {
- "value": true,
- "text": "Active"
}, - {
- "value": false,
- "text": "Not active"
}
]
}If your request table is not automatically updated, due to a weak connection or other problems, you can simply reload the page and get the updated table.
The user's API-key is always available in the first e-mail received from the Onboarding service.
The type list is always available in the documentation provided by Bit4ID to your organisation.
To find out the role of your user you can contact the List all API by entering your own email as
a constraint. In the response, you can find your user role at the path result[n].role.
From the web interface, you only need to go and click on the icon with your initials in the top right-hand corner, and read the role field into the menu.
To obtain the slug of your organisation, you can access the Onboarding link with a manager user.
Visit the organisation section, click on your organisation on the right-hand side and you will be able to read and copy the slug.
How can I find out the request types activated for my organisation?
To obtain the type list of your organisation, you can access the Onboarding link with a manager user.
Visit the request type section and see all active types.
From here, by clicking on the required type, it is possible to read its id, which corresponds to the type parameter in the API.
If you want to know the slug using the API alone, you can contact the Retrieve all domains
API and follow the path results[n].slug.
First you have to access to Onboarding link with a manager user.
Then go to Operator section. Here the application allows you to disable an operator by accessing the list of operators, clicking the three dots next to the user you wish to disable and pressing the 'Disable' button as shown in the figure.
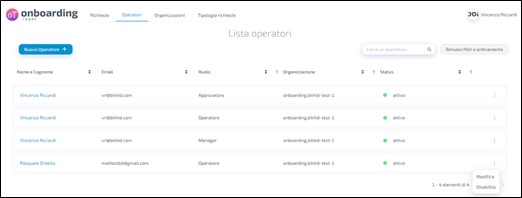
The application asks you to confirm your choice.

Pressing the 'Cancel' button will cancel the operation, pressing the 'OK' button will notify the application of the success of the operation and the user will appear in the list as 'inactive' and therefore unable to use the platform.
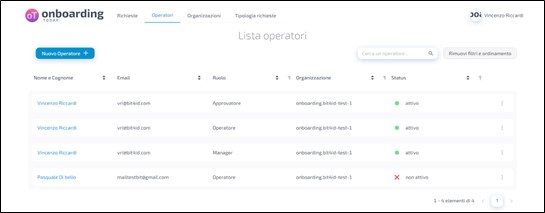
You can rehabilitate the user by accessing the list of operators, clicking the three dots next to the user you wish to rehabilitate and pressing the 'Enable' button.
You have to implement an endpoint that contacts Onboarding towards the API Get an identification request by entering the id of the request under consideration.
Once you get the response you have to explore the path data.spid_code,
if this field is filled it means that the identification was done with SPID, if the
field is empty it means that the identification was done with CIE.
A successful identification request will return a notification with the status set to performed.
To create an anonymous request, you can simply use the Create an identification request API and not declare the users field. The platform will perform the request as anonymous.
In this section we will look to all permissions available on onboarding platform and which are enable for every role available for your organisation.
| Permission | Operator | Approver | Manager |
|---|---|---|---|
can_view_identityrequest |
V | V | V |
can_compile_identityrequest |
V | V | V |
can_create_identityrequest |
V | V | V |
can_modify_identityrequest |
V | V | V |
can_view_operator |
X | X | V |
can_create_operator |
X | X | V |
can_modify_operator |
X | X | V |
can_view_domain |
X | X | V |
can_modify_domain |
X | X | V |
can_view_identityrequesttype |
V | V | V |
can_view_mandatetype |
V | V | V |
can_view_mandaterequest |
V | V | V |
can_compile_mandaterequest |
V | V | V |
can_create_mandaterequest |
V | V | V |
can_modify_mandaterequest |
V | V | V |
can_approve_mandaterequest |
X | V | X |
can_view_identitypropagation |
V | V | V |
can_create_identitypropagation |
V | V | V |
can_modify_identitypropagation |
V | V | V |
In this section we will look to the most common errors in Onboarding divided by tables and descripted.
Errors during the authentication process with SPID.
| Code | Description |
|---|---|
2034 |
Restart procedure |
2035 |
Restart the procedure ensuring that the SPID identity used matches the request |
2036 |
SPID does not appear to be valid, please contact the right organisation for verification |
2037 |
Authentication Cancelled |
2038 |
Error, restart procedure |
2039 |
Missing data in SPID. Re-run the procedure and if necessary contact the right organisation |
2050 |
User is not old enough to continue with the operation |
2148 |
Expired Request |
Errors during the authentication process with CIE.
| Code | Description |
|---|---|
2034 |
Restart procedure |
2035 |
Restart the procedure ensuring that the CIE identity used matches the request |
2036 |
CIE does not appear to be valid, please contact the right organisation for verification |
2037 |
Authentication Cancelled |
2038 |
Error, restart procedure |
2039 |
Missing data in CIE. Re-run the procedure and if necessary contact the right organisation |
2050 |
User is not old enough to continue with the operation |
2148 |
Expired Request |
| Code | Description |
|---|---|
2032 |
Error during system authentication |
2049 |
Missing authorization header. |
2080 |
Can't make authentication to inactive organization |
| Code | Title | Description |
|---|---|---|
4000 |
START_OK_CALL |
Users already identified |
4000 |
START_SUSPENDED_CALL |
For the user there is an identification waiting to be approved |
4000 |
START_CALL_LIMIT_REACHED |
The user had reached the maximum number of video identification |
4000 |
START_PENDING_CALL |
For the user there is a pending request to be done |
4000 |
START_DEFKO_CALL |
The id-order is not valid |
4001 |
The operator rejects the identification |
Errors obtained from the onboarding platform.
| Code | Description |
|---|---|
2148 |
Expired Request |
2164 |
Cannot create an Identity Request with this external reference |
11000 |
The authentication system generated an unexpected error |
11001 |
Unable to connect to authentication support servers |
11002 |
Missing data |
11003 |
Illegal argument |
11004 |
User with the same TIN and role already exists in the specified organization |
11005 |
Bad OTP send |
11006 |
Requested service is not available |
11007 |
Specified API key has been already associated to another user |
11008 |
Specified username has been already associated to another user |
11009 |
Invalid credentials |
11010 |
Token is not active |
11011 |
Token is too old |
11012 |
Token has been already invalidated |
11013 |
Provided token is not well formed or is too old |
11014 |
User does not have the necessary permissions to perform the request |
11015 |
Time interval too short. Please wait 60 seconds to ask a new OTP. |
11016 |
User does not exist |
Boarding Gate allows the identification process to be carried out without the support of specialized operators.
The service uses NFC technology to read the individual's identity information contained in the chip of the new generation documents the CIE and e-passport.
Boarding Gate collects data from documents using two different channels:
Mobile APP
NFC reader
The environments to integrate Boarding Gate via API is.
| Environment | Description | Endpoint |
|---|---|---|
| Live | Production environment | https://id-doc.onboardingtoday.com |
This tutorial shows you how to use Boarding Gate. To use the Boarding Gate API is important that you understand the basics of RESTful web services and JSON representations. Boarding Gate allows two processes:
Reading document using mobile app
Reading document using potable NFC lector
For the testing phase is available an SDK in Agular that allows the functioning of the two flows explained below.
The mobile app process allows you to read data in CIE and e-passport.
Before you begin
To use the X-API-KEY, you need to define the
x-api-keyHTTP header which contains HTTP header which contains the API-KEY value. The API-KEY token is static and has no expiration.Setup a postback server, for receiving the collected data
(Optional) Setup a Webhook server
Step 1 Get the code
The integrator starts the flow by requesting a code from the backend to authorise the request to read the document with the mobile app by contacting the Generate code API. In this invocation the integrator will pass the URL of the postback server to which it will POST the data read from the mobile app.
(Optional) It is also possible to pass the URL of the webhook service. Note: This address must be on a domain enabled for the APIKEY used.
Step 2 Communicate the code
The integrator must communicate the code received in response to the Get the code call to the end user by following the path body.requestID.
Step 3 Read the document
The user after receiving the code provided by the integrator will open the app and continue following the steps to scan the document. At the end of the process the user sends the data to the backend of Boarding Gate by entering the request code. The Boarding Gate backend will send a POST to the postback service exposed by the integrator.
The NFC allows you to read data in CIE.
Before you begin
- Get a NFC reader
- Install the ST-AGENT to communicate with the Boarding Gate ecosystem and to detect the NFC reader.
Step 1 Start the reading process
The integrator uses the sandCan function to start reading the CIE by passing the CAN code as input.
Step 2 Read the document
The user after receiving the code provided by the integrator will open the app and continue following the steps to scan the document. At the end of the process the user sends the data to the backend of Boarding Gate by entering the request code. The Boarding Gate backend will send a POST to the postback service exposed by the integrator.
Note: If the ST-AGENT is not available, the SDK notifies the application via callback the need to show the user a message that invites the user to download, the SDK component provides the download links.
The Boarding Gate backend only notifies with a POST to the integrator postback server if the document reading process via app is ended successfully by passing all the data collected. You can easily set the postback channel by setting the 'postbackUrl' parameter in the 'Generate code' API. If the postback service requires an authentication mechanism you can easily configure the token bearer by setting the "postbackToken" field in the "Generate Code" API. The service of notification sends two different payload depends on what kind of document has been read:
CIE postback, it will contain the user's personal information, the results of SOD checks and links to view the photos taken of the documents when scanned with the APP
  {
    "requestId": "123456",
    "lastName": "ROSSI",
    "firstName": "MARIA",
    "cityOfBirth": "ROMA",
    "sex": <sex>,
    "stateOfBirth": "RM",
    "city": "ROMA",
    "state": "RM",
    "personalNumber": "RSSMRA95A58H501Z",
    "address": "VIA SALARIA, N. 712",
    "citizenship": "ITA",
    "dateOfBirth": <date_of_birth>,
    "documentNumber": <document_id>,
    "dateOfIssue": <date_of_issue>,
    "documentType": <doc_type>,
    "issuingAuthority": "MINISTERO DELL'INTERNO",
    "issuingState": "ITA",
    "dateOfExpiry": "2031-01-18",
    "photo": <link>,
    "imageFront": <link>,
    "imageRear": <link>,
    "metadata": null,
    "email": null,
    "sod": "MIILKQYJKoZIhvcNAQcCoIILGjCCCxYCAQMxDTALBglghkgBZQMEAgMwggHiBgZngQg...",
    "sodVerified": {
      "is_expired": false,
      "is_revoked": null,
      "is_trusted": false,
      "is_signature_valid": true,
      "signer_info": "C=IT,O=Ministry of Interior,OU=Direz. Centr. per i Servizi Demografici - CNSD,SERIALNUMBER=00019,CN=eIdentityCardSigner"
    },
    "hashes": {
      "1": "D683C2D7BA8CEEFBEC06D082D340A0C8175C8A612BE8B3269B4832E05B1EA3C2510...",
      "2": "776E735718BD5A971F0E421C250830FA205C73C5DB2BAAF3CBA52B96CF627F63E7A...",
      "11": "5758B74984B37E90AA2E8812272F0AA2B2D6BFE2DFC46509F028810F939FFCF028...",
      "12": "8296D0424CD6E84C75DFF194C7F38D527D8C91B555143F1FBA8235C75F1B232086...",
      "14": "A47370A35C1DE02A9E1234DADAF712FDC7282DF34DB00A096A6341BFB6F73B48AC..."
    },
    "mrz": null
  }
Passport postback, it will contain the user's personal information, the results of SOD checks and links to view the photos taken of the documents when scanned with the app. Notice that the e-passport is lacking in some information such as
personalNumber,stateOfBirthand so on.{ "requestId": "123456", "lastName": "ROSSI", "firstName": "MARIA", "cityOfBirth": null, "sex": <sex>, "stateOfBirth": null, "city": null, "state": null, "personalNumber": null, "address": null, "citizenship": "ITA", "dateOfBirth": <date_of_birth>, "documentNumber": <document_id>, "dateOfIssue": <date_of_issue>, "documentType": <doc_type>, "issuingAuthority": null, "issuingState": "ITA", "dateOfExpiry": "2033-03-05", "photo": <link>, "imageFront": <link>, "imageRear": <link>, "metadata": null, "email": null, "sod": "d4IKlDCCCpAGCSqGSIb3DQEHAqCCCoEwggp9AgEDMQ0wCwYJYIZIAWUDBAIDMIIBVAY...", "sodVerified": { "is_expired": false, "is_revoked": null, "is_trusted": true, "is_signature_valid": true, "signer_info": "C=IT,O=Ministry of Interior,OU=National Electronic Center of Italian National Police,SERIALNUMBER=0014,CN=ePassportSigner" }, "hashes": { "1": "F3DE4E34F6C8A05E79ADF0AE34C84A041CA6FF39CEBEDF707179574DB22142D87C3...", "2": "0E376F8550A72C08C34EDC47CA77DA47F010742BA71A4141B9664A1678E81E417F8...", "3": "98E6DA61E62A911EE3D68340F9FC067447887F7AA21130C0A0106B54DCC03F44B52...", "14": "B19959227D0DE4CC65643AB9A37B84C75F8FA65F00CDC120962B8CD0ABA08A7917..." }, "mrz": null }
For starting the test phase with the SDK make sure to have NodeJS and Angular on your machine. To use the SDK follow these steps:
Download the SDK
Unzip the SDK.zip file
Open the SDK folder into the terminal
Use the
npm installfor installing Node packagesUse the
ng servecommandOpen the browser on http://localhost:4200/
Start testing!
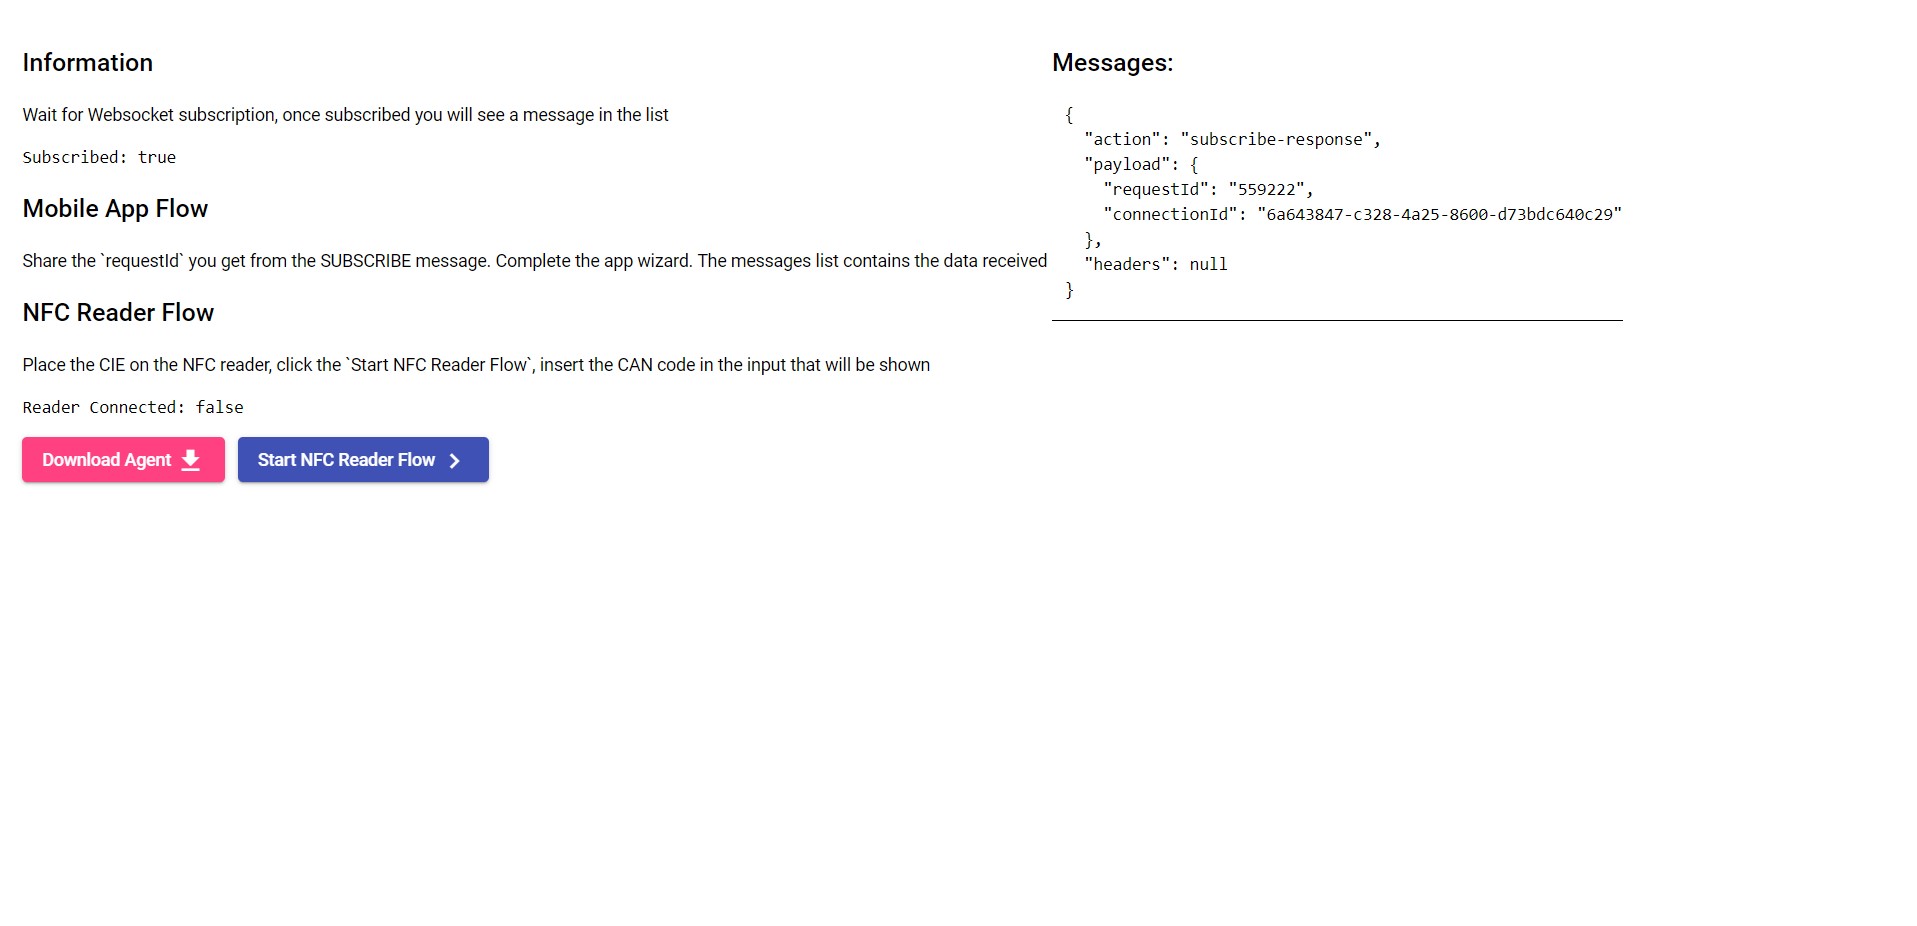
Once you land on the web interface you can choice which method you prefer and follow these instructions:
APP flow, you have to open the mobile app. Then start the reading flow clicking choosing between "Avvia la scansione" or "Inserisci manualmente" in the home.
If you choose "Avvia la scansione" you can take the picture of front your document.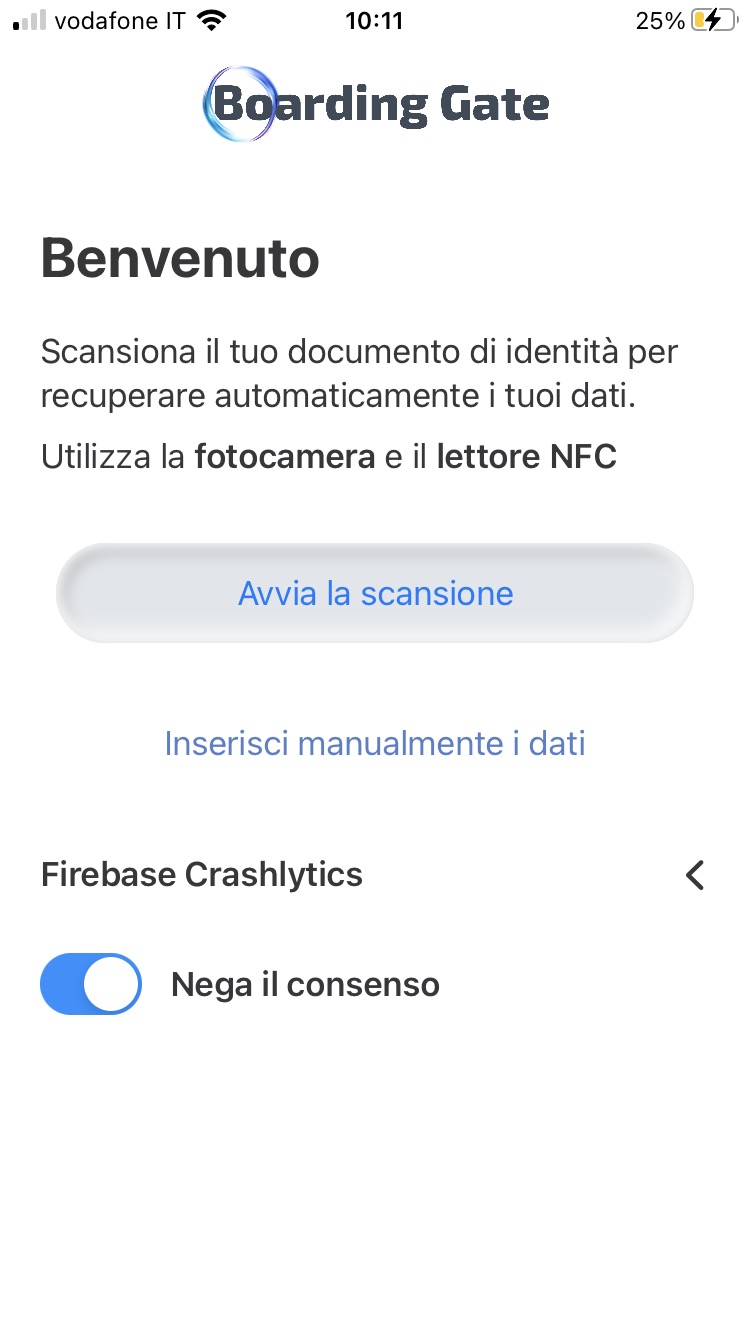
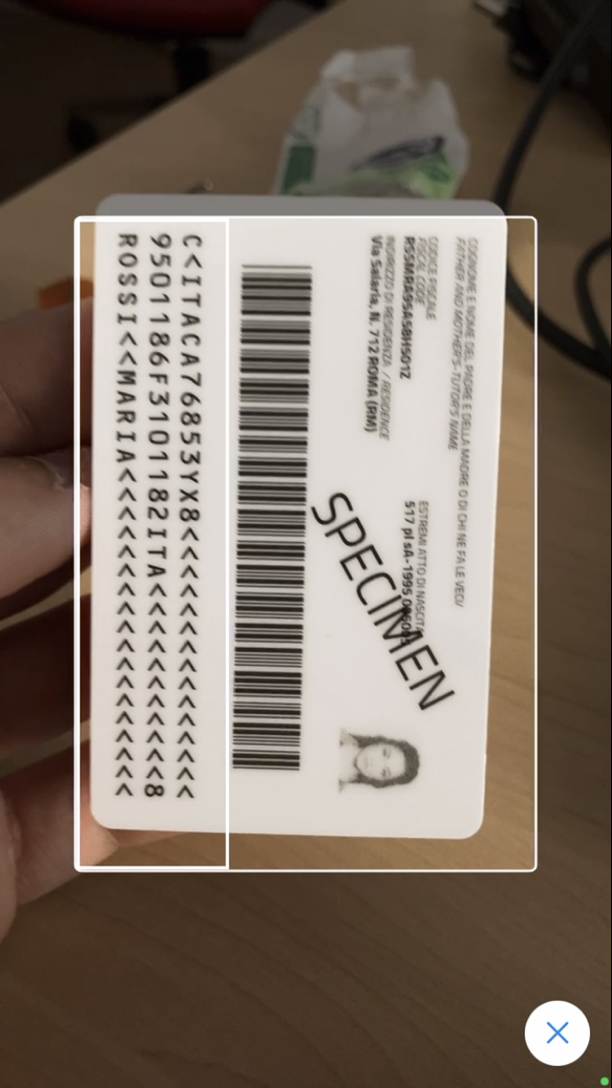
Then scan the back of your id document or the first page of your e-passport. In this way the app can read the MRZ code.
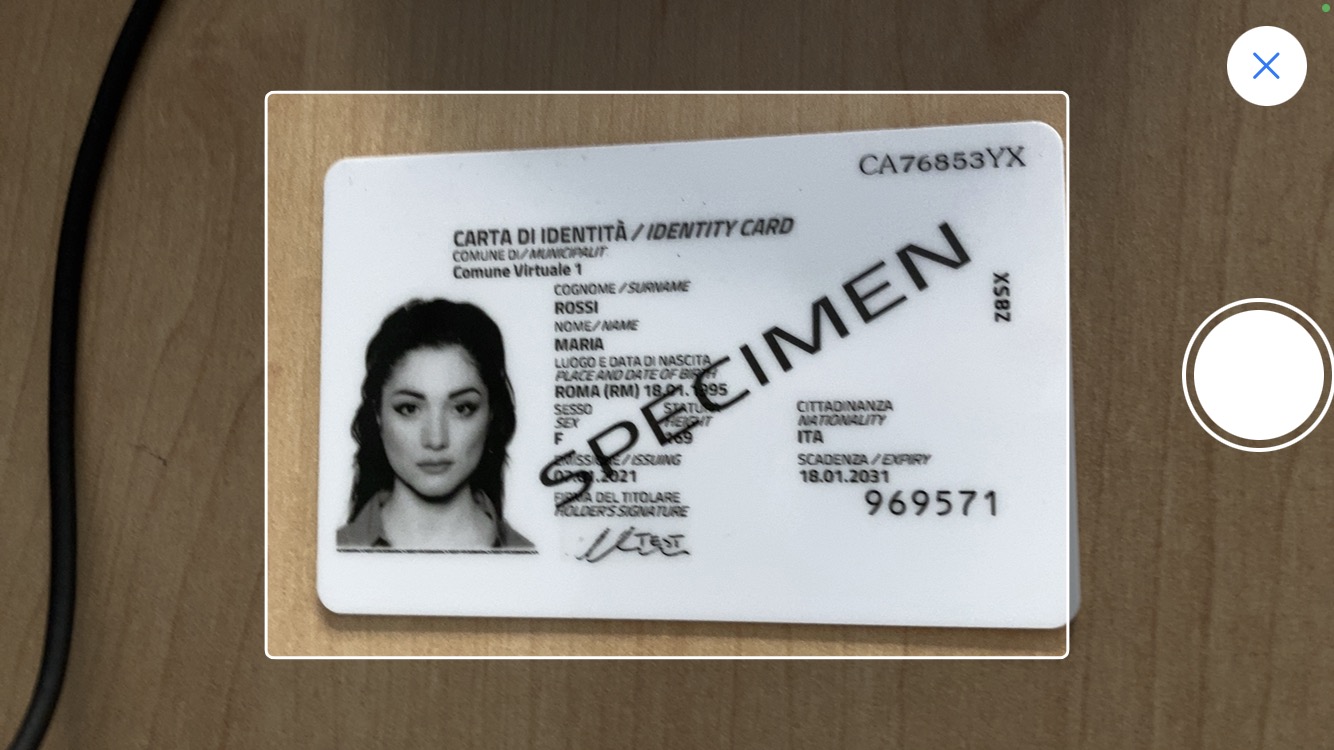
If you have problem with the reading of MRZ code by the app, you can go back to home and choose the "Inserisci manualmente" process.
In this case you have to insert the document code, your birth date and the expiration date of your document.
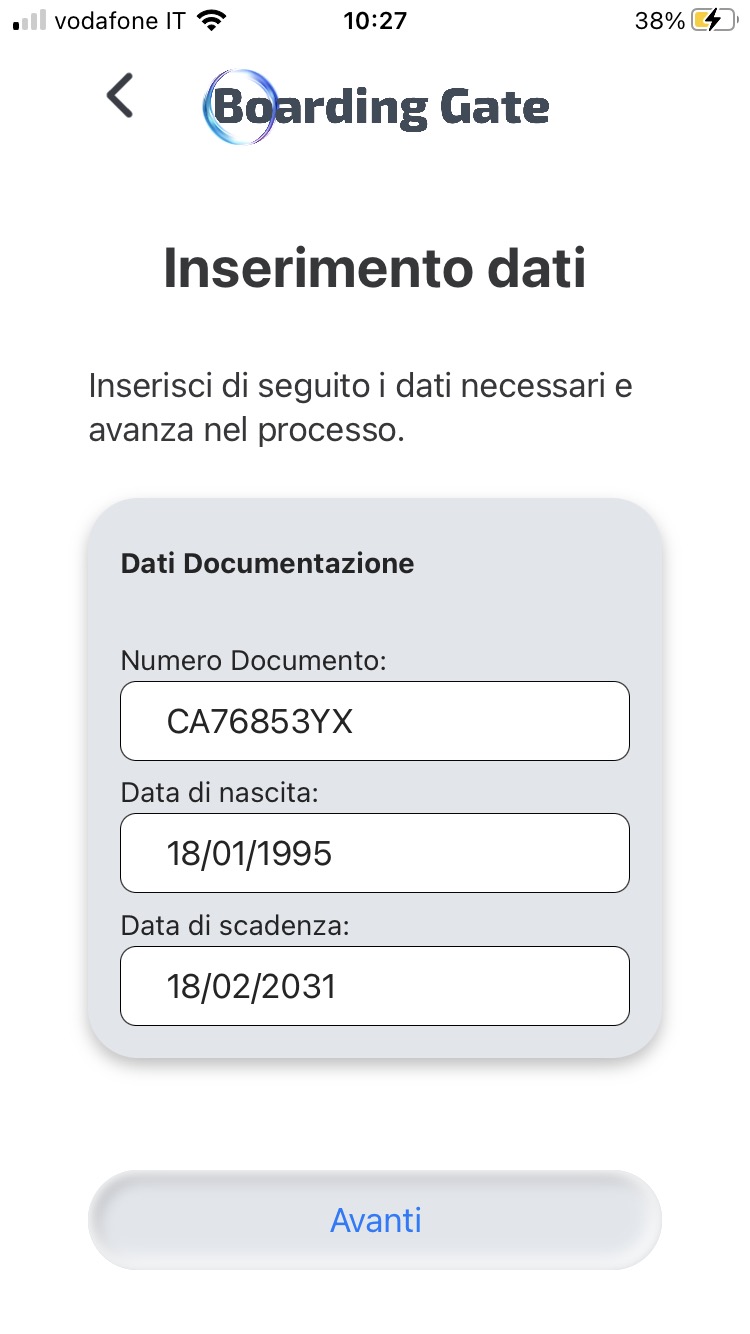
Then you can take only the picture of your document following the instruction.
One you have collected the document data you'll land on a summary page.
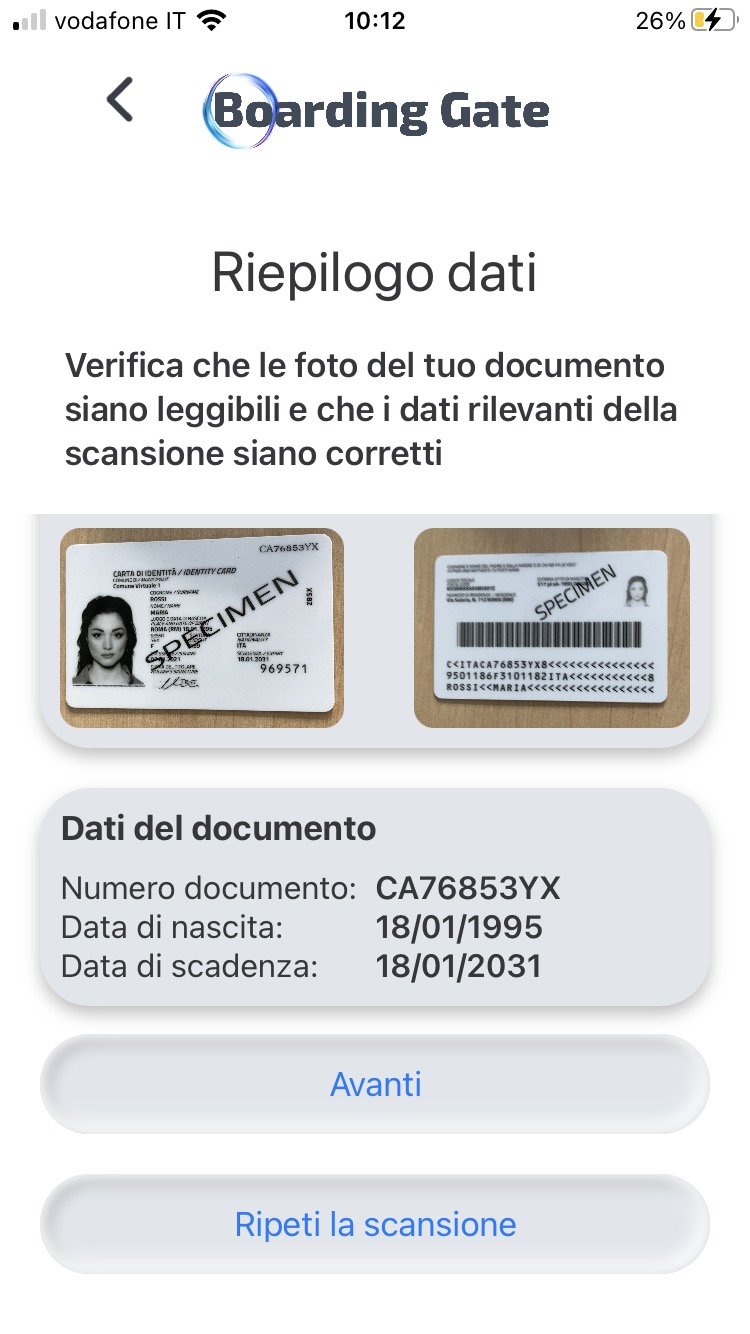
If the images are sharp and the data correct you can continue with NFC reading process by clicking on "Avanti". In case of problems, you can repeat the first step by clicking on "Ripeti la scansione".
After clicking on "Avanti" the app will show a box in which displays what kind of data is reading.
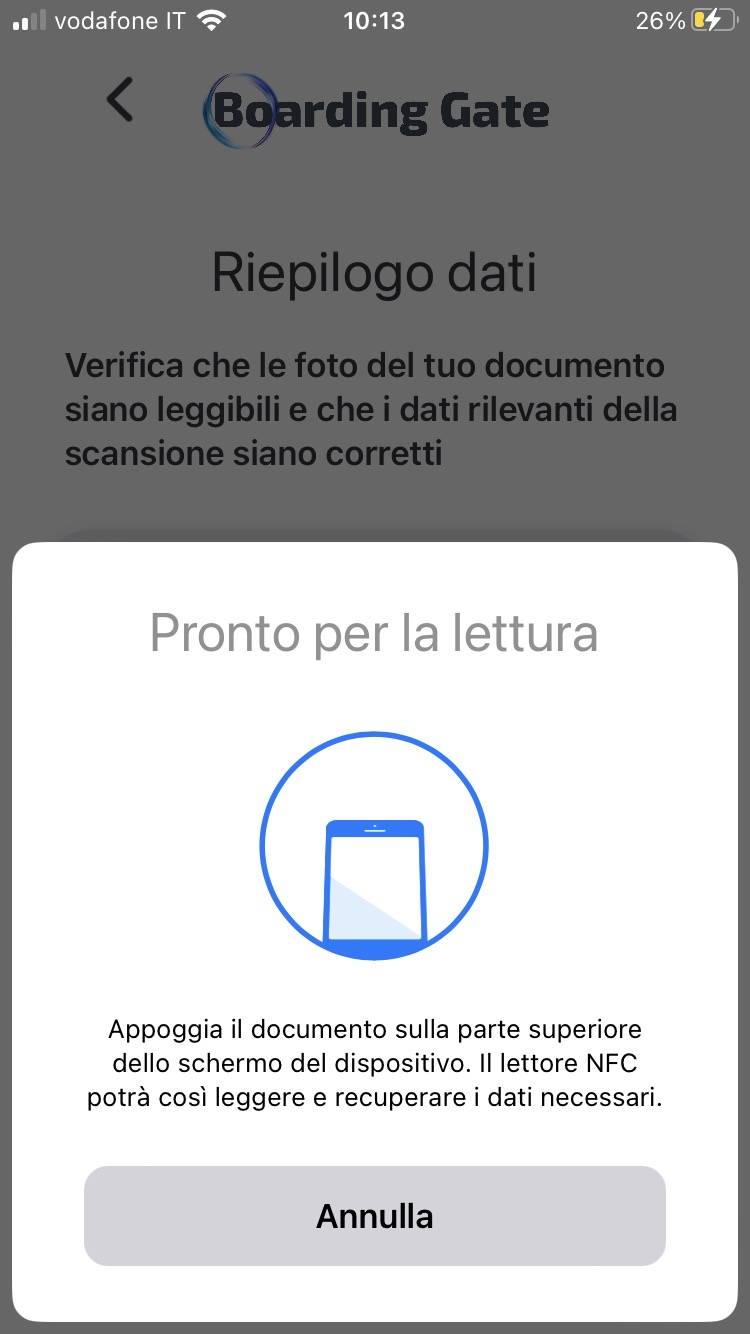
Now you'll land on the last summary page in which you can see your personal information.
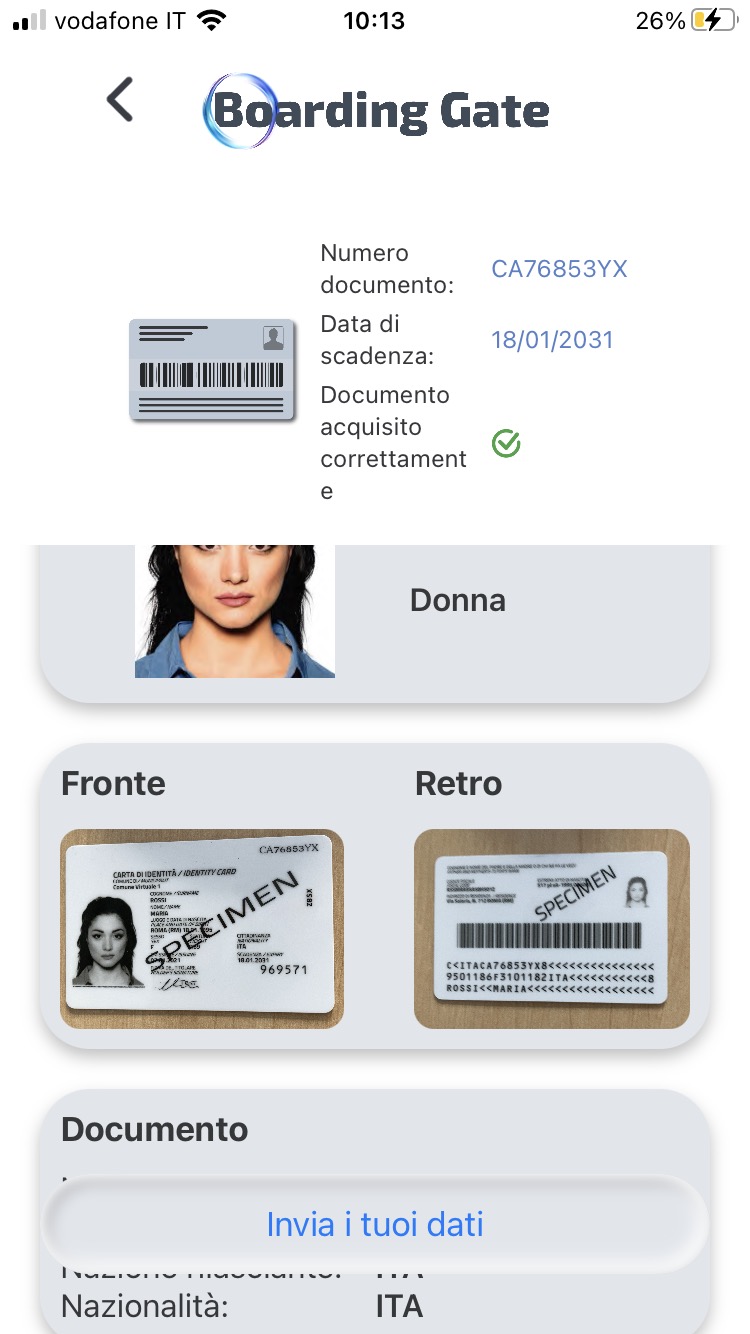
In the end click on "Invia i tuoi dati" and insert the code into the grey bar, then click on "Invia".
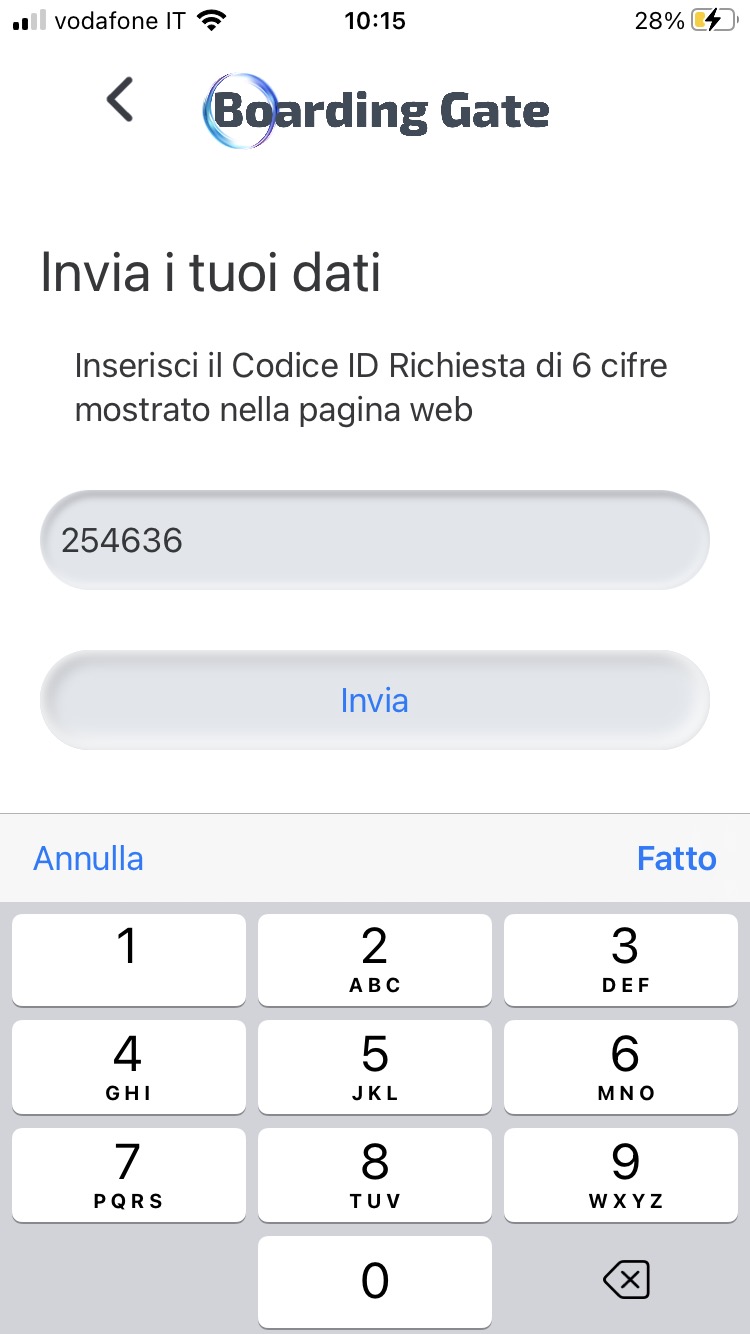
Now you will see into your interface the collected data.
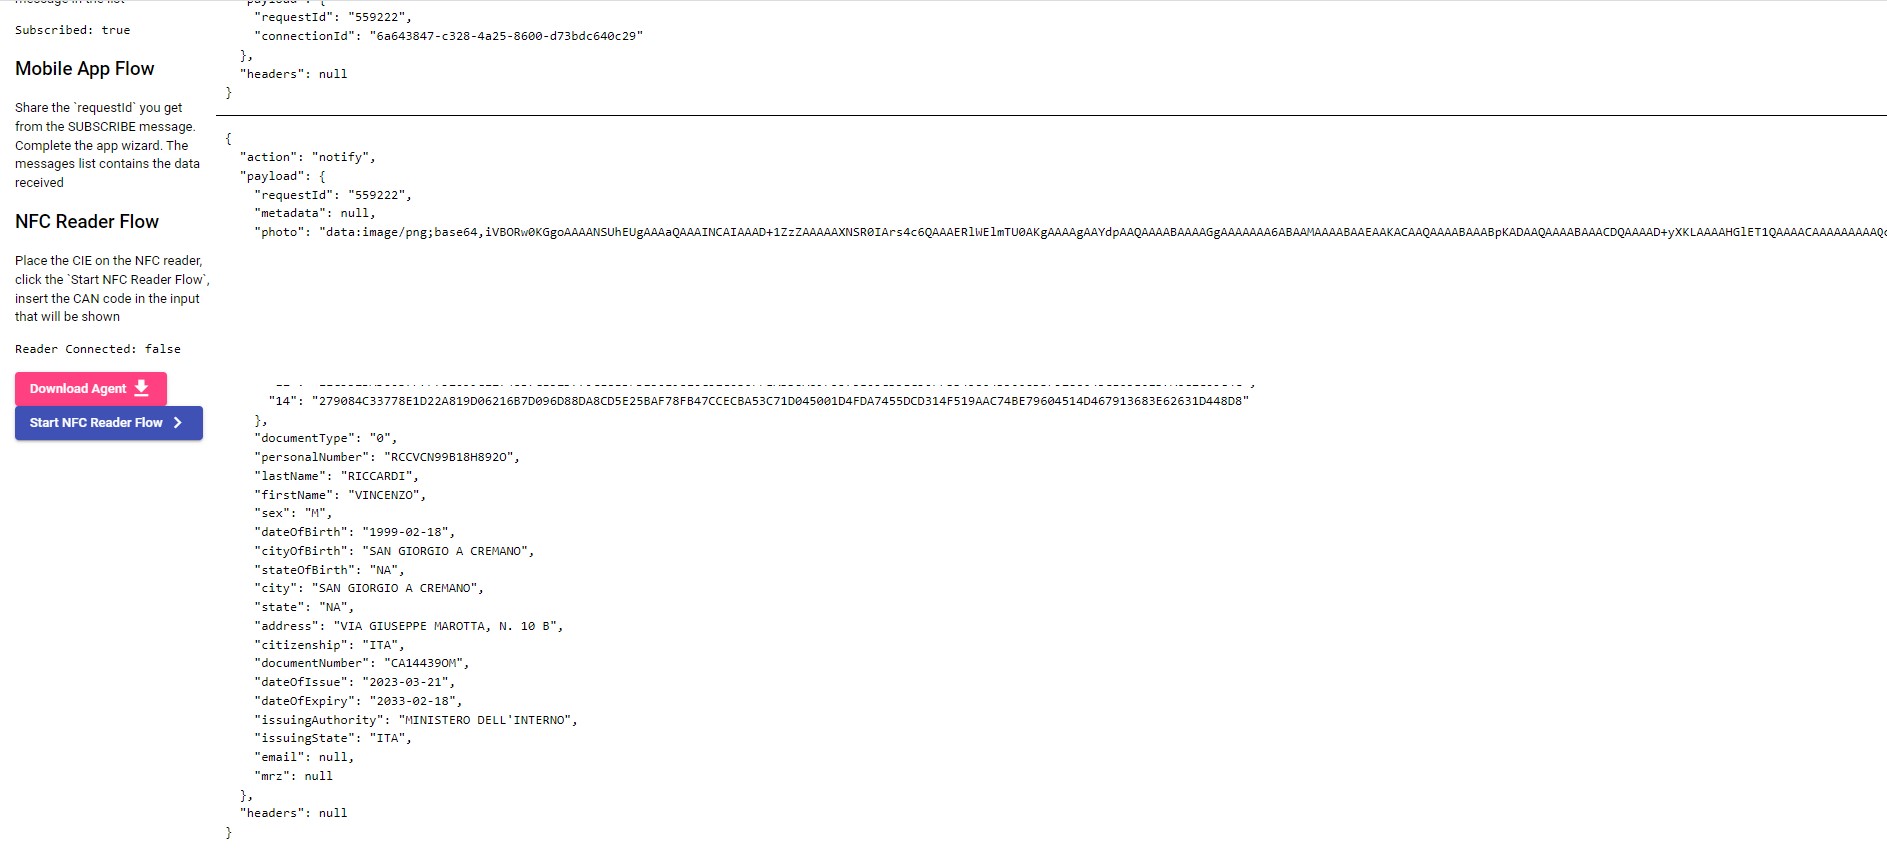
NFC Reader flow, you have to downloand and install the Agent available clicking on Download Agent button in web interface, then connect the NFC reader to the computer.
From the web interface click on "Start NFC Reader Flow". Get the CAN Code of you CIE, in the Italian CIE the CAN Code is the number at the bottom right on the front of the document.

Once you have founded your CAN code insert it in the web interface as in figure.
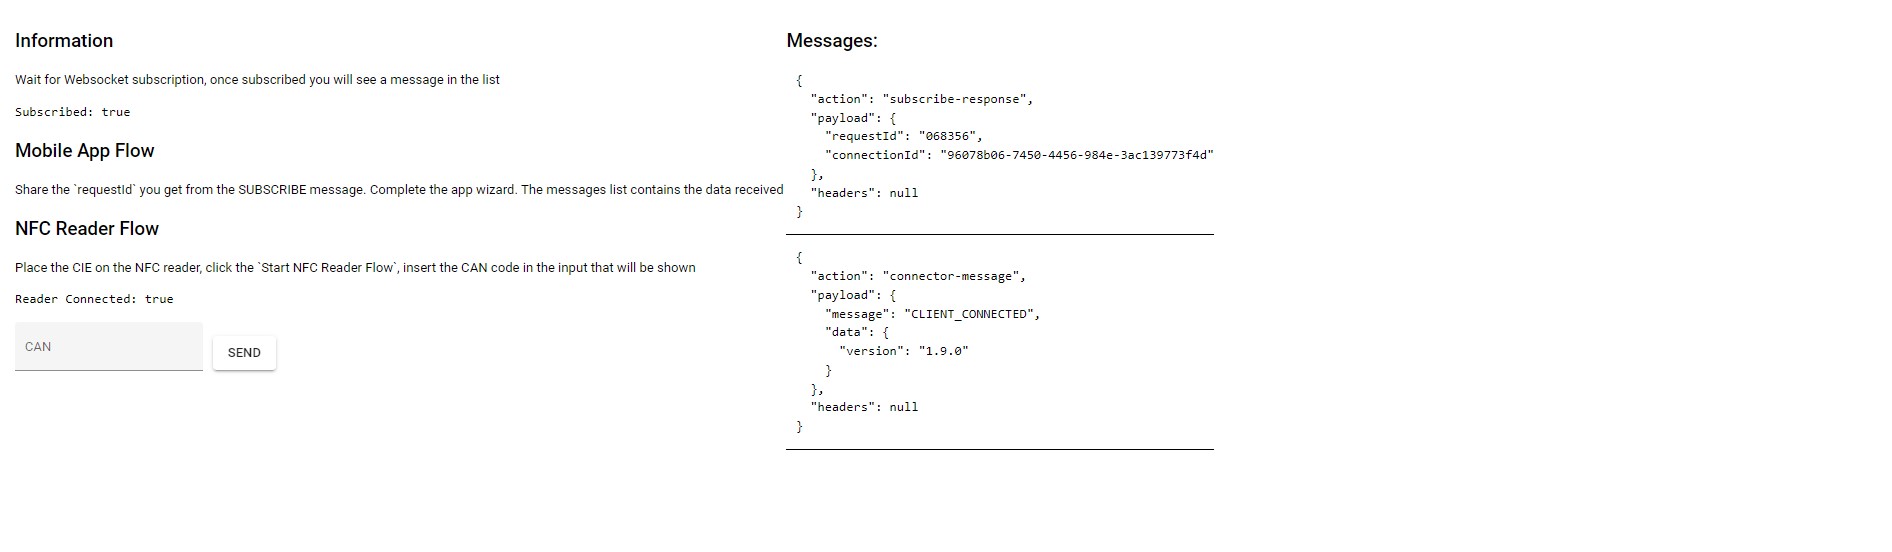
Place the card on the NFC reader and click on "Send". You will see on the screen the data received by the player as in figure.
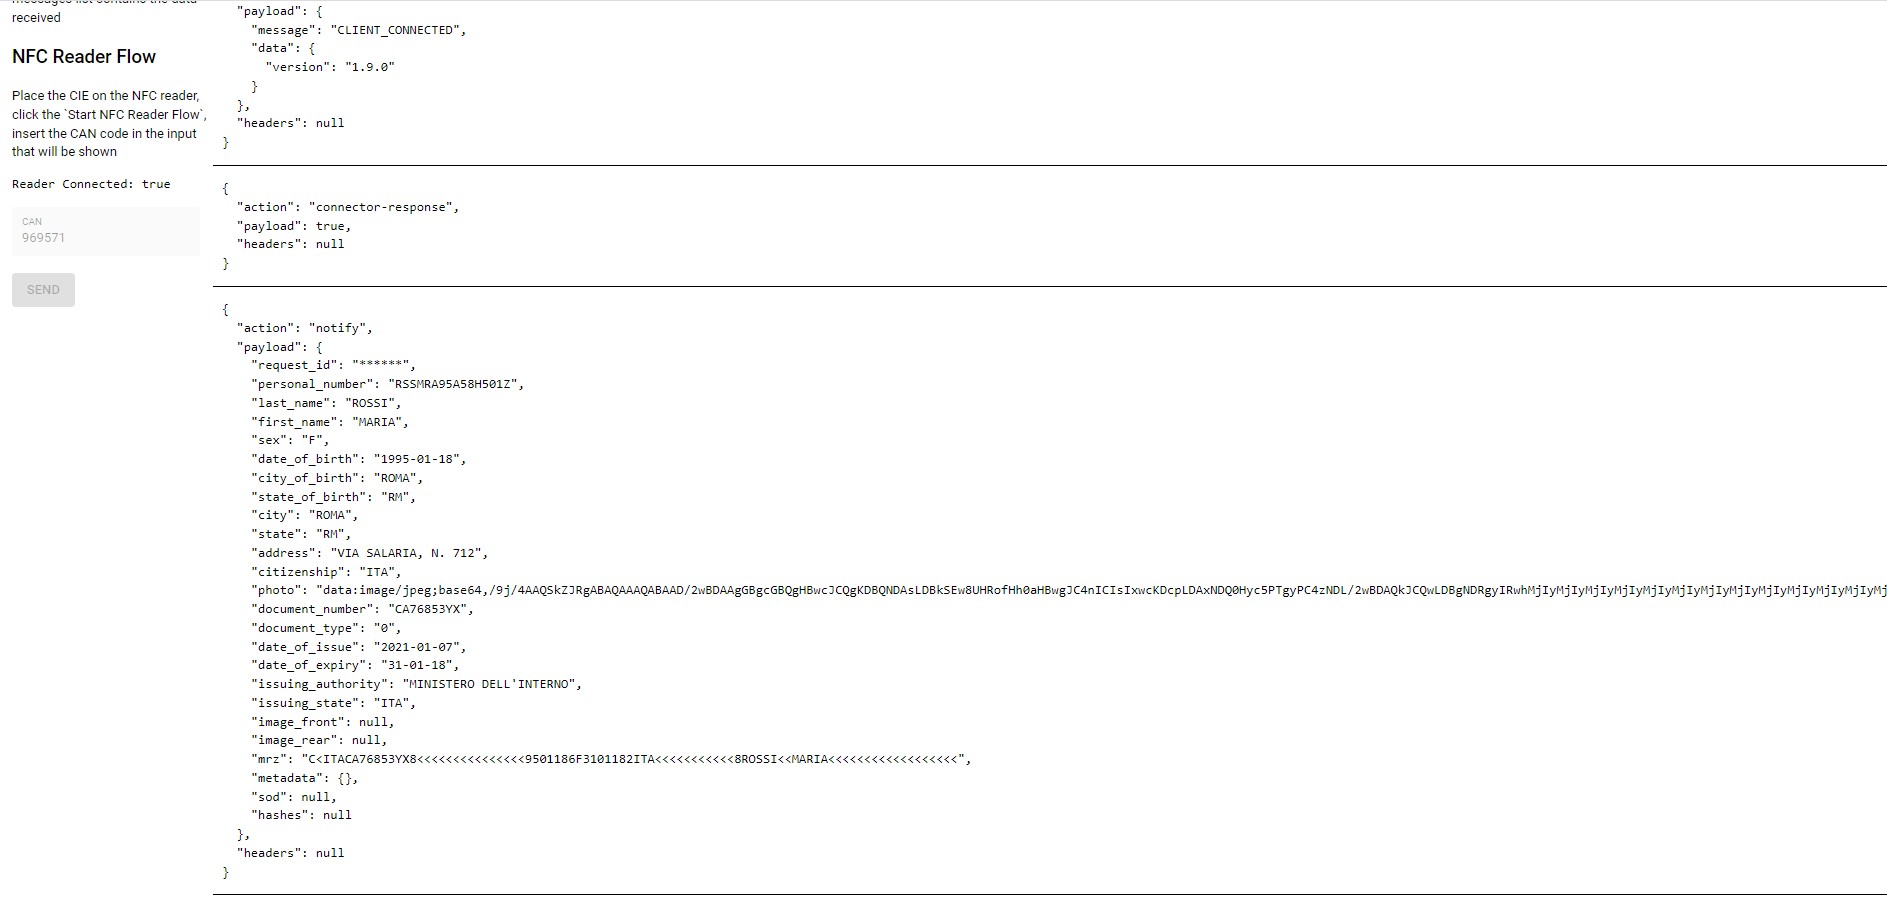
Generate Code
With this API you can request a new request_id. In addition, you can set:
postback server, using
postbackUrlfields to define the server address, andpostbackToken, if authentication is required.webhook server, using the
webhookUrlfields to define the server address, andwebhookToken, if authentication is required.
Authorizations:
query Parameters
| postbackUrl required | string <uri> (Postbackurl) [ 1 .. 65536 ] characters Url of your postback server |
| postbackToken | string (Postbacktoken) Bearer token for authenticate to your postback server |
| webhookUrl | string <uri> (Webhookurl) [ 1 .. 65536 ] characters Url of your webhook server |
| webhookToken | string (Webhooktoken) Bearer token for authenticate to your postback server |
header Parameters
| connection-id | string (Connection-Id) |
Responses
Response samples
- 200
- 422
{- "status_code": 200,
- "body": {
- "request_id": 97611,
- "timestamp": 1690452227.263333,
- "info": {
- "connectionId": 36552,
- "postbackToken": "XXXXXXXXXXXXXXXXX",
- "webhookToken": "XXXXXXXXXXXXXXXXX",
- "hasWebsocket": false,
- "metadata": { }
}
}
}Verify Request Id
Use this API to check the validity of the request_id.
Authorizations:
query Parameters
| request_id required | string (Request Id) \d{6}
|
Responses
Response samples
- 200
- 409
- 422
- 500
{- "status_code": 200,
- "body": {
- "request_id": 97611,
- "timestamp": 1690452227.263333,
- "info": {
- "connectionId": 36552,
- "postbackToken": "XXXXXXXXXXXXXXXXX",
- "webhookToken": "XXXXXXXXXXXXXXXXX",
- "hasWebsocket": false,
- "metadata": { }
}
}
}Sod Verification
By this call you can verify the integrity of the SOD of your document
Authorizations:
Request Body schema: application/json
| sod required | string (Sod) |
required | object (Hashes) |
Responses
Request samples
- Payload
{- "sod": "string",
- "hashes": {
- "property1": "string",
- "property2": "string"
}
}Response samples
- 200
- 422
{- "status_code": 200,
- "body": {
- "sod": "d4ILIDCCCxwGCSqGSIb3DQEHAqCCCw0wgg...",
- "hashes": {
- "1": "E2166C0B67C6901C42A95BDAE375AF5CCCC8A9CE",
- "2": "D3C2008FF3333B52AEC0E44AE52C30E6916B3868"
}, - "verificationResult": {
- "is_expired": false,
- "is_revoked": false,
- "is_trusted": true,
- "is_signature_valid": true,
- "signer_info": "C=IT,O=Ministry of Interior,OU=Direz. Centr. per i Servizi Demografici - CNSD,SERIALNUMBER=00001,CN=eIdentityCardSigner"
}
}
}In this section we will look to the most common errors in Boarding Gate.
| Code | Description |
|---|---|
1000 |
A generic error has occurred |
1002 |
Authorization fail |
1003 |
The request_id is expired |
1004 |
Data was not acquired properly, please repeat the registration process. |
1005 |
Authorization fail |
1006 |
Data was not acquired properly, please repeat the registration process. |
1007 |
The request_id is expired |